This is the step where, if you don’t have a decent set of wood cutting/shaping tools, the job can get a little tricky. But, we’ll explore a couple methods you can take to if you don’t have the full array of tools at your disposal.
Typically when you think about the “face” of a wood-based project, you think solid wood. You get the beautiful grain patterns and best of all, don’t have to worry about covering up the visibly plys often left exposed when plywood is used. In the case of the bed frame sides, I would have needed at least 12″ wide solid wood boards, if I used the traditional “face frame” approach.
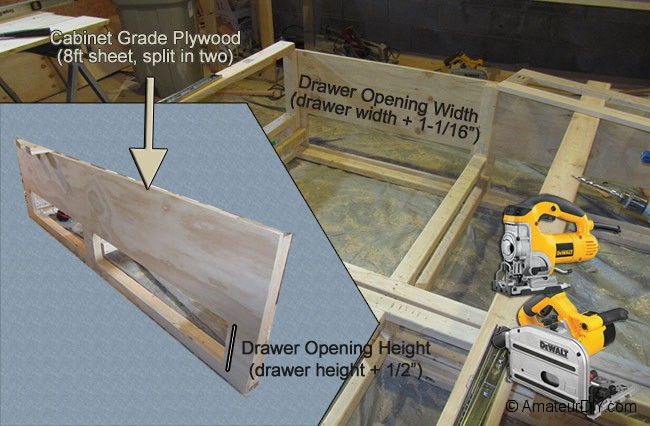
Instead, I opted to use a sheet of cabinet grade plywood. The 24″ width created by splitting the plywood down the middle was the perfect height for the bed frame. The difference here is that instead of “creating” the drawer opening by surrounding it with solid wood stiles and rails, I would be cutting the opening out of the plywood sheet. Cut the sheets 3/4″ longer than the rough bed frame. This part is important, as you’ll see in the next step. That extra 3/4″ will help hide the visible plys created by the footboard. So, that extra 3/4″ should “hanging off” the foot of the bed.
I purchased 1/2″ wide drawer glides for the drawers, meaning the opening needed to be 1 full inch wider than the drawer itself. I found that adding an extra 1/16th inch to the total width is a pretty good practice. For the height, a 1/4″ clearance at the top and bottom of the drawer is sufficient, if you are using side-mount drawer glides.
Before cutting the openings, I first fastened the sheets to the frame using a finishing nail gun. Another, cleaner method would be to use a biscuit joinery, where a small “slit” is cut in both pieces of wood that are to be joined, then connected with a small oval-like biscuit. Biscuit joiners are not expensive (under $100), but they are typically not part of an amateur woodworkers arsenal. A third option still would be to use pocket-hole joinery. I’ll talk more about that when we get into the drawer and head/footboard frames.
Since the sheet is large, and I have wood filler that’s pretty close to the stain color we chose, I took the easy route of finish nailing the sheets onto the frame.
It was now time to cut the drawer openings. I used a jigsaw, but if you don’t have one, you can very carefully do it with a circular saw. A plunge saw would be ideal, since are starting your cut in the middle of the sheet. But, considering that the edges of the opening will be covered by the drawer face (when the drawer is closed), your cuts don’t have win any awards. A careful run with the circular saw would be fine.