
I didn’t discover pocket hole joinery until a couple years ago, at which point I was blown away at this untapped method for joining “finishing” work such as face frames and trim. I had been accustomed to biscuit joinery (essentially gluing two boards together with a small wooden oval in-between to add strength), but it was more time-consuming, required owning multiple clamps to keep a project moving, and was permanent.
Pocket hole joinery solved all of those problems at a very small trade-off for strength. Joining with the pocket hole method isn’t quite as strong as with glue, but it’s sufficient for most projects. You do have the option to dab some glue between the joints, however, without requiring a clamp to hold it in place.
What’s best of all is that you can get up and running with quality pocket hole equipment at a lower cost than with a quality biscuit joiner. Expect to pay a minimum of $150 for a quality, name-brand biscuit joiner; a pocket hole kit might run you $60. When you compare the fasteners themselves (biscuits vs. pocket hole screws), the cost is similar.
The minimum you need to get started is a face clamp, pocket hole kit, and self-tapping pocket hole screws. I’ve listed the exact products that I have for my pocket hole joinery setup below. I also spent a few minutes this morning to put together a very low budget video on it’s use!
 |
 |
 |
 |
I’ve included both the 1-1/4″ and 1-1/2″ screws above. The 1-1/2″ are ideal for joining boards along the same “plane”, as shown in the video. But, if you work with 3/4″ solid wood, and will be joining in two different planes (one board upright, one flat), you need to use 1-1/4″ screws. This will prevent the head of the screw from poking through the finished surface of the wood.
Issues
I love the Kreg Jig, but there’s only so much you can expect from a $35 product. My primary complaint is the drill bit. The little pilot tip at the end of it is easy to break off. In all fairness it lasted me a year before breaking, but at one point, I turned the drill as I was removing it from the jig and the tip broke off.
 The bit is useless without the tip. It will make the pocket hole, but there is nothing to pilot the pocket hole screw at the correct angle.
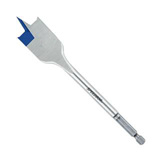
If this happens though, it’s not the end of the world. I’ve been getting by okay with a 3/8″ wood boring spade bit.
Really my only other complaint is that the jig is made of plastic. Granted, it’s a hard plastic like those found in heavy duty electrical boxes. Even so, after time, the grooves that hold the face clamp to the jig have worn down to the point where the jig “falls off” of the face clamp about half the time when I am drilling vertically.