If you’re an intermediate woodworker, skip this post. Why? Because I have nothing to offer those who already have some experience staining wood. My staining skills are intermediate at best and, if I had the budget, I’d pay someone else to stain and top coat my projects.
Nevertheless, I have learned a few things over the years as I struggle to become a decent wood finisher. While this post is in the context of the platform bed project we’re working on, it applies to any solid wood or plywood project.
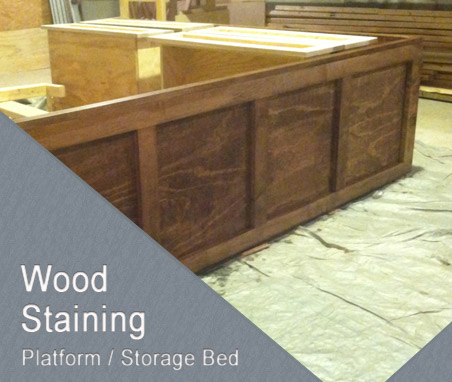
 The platform bed has a significant amount of visible plywood face (none of the plies or sides are visible), so I had to make sure I used a plywood with a decent grain. The other option, of course, is to paint. I prefer paint as it’s much more forgiving of your level of wood craftsmanship. In my case though, the rest of the furniture in the room is stained, so we wanted a consistent look.
Tacking on the few things I learned in the bed project, here’s my cumulative (albeit limited) knowledge on the art of staining:
- Stain is thin. It drips, flicks, flies, sprays and splatters. If you’re using a foam brush, move it slowly from the stain can to the work piece. Foam brushes don’t absorb the stain as well as a rag does, so it will make its way off of the brush easily.
- Start at the top and work down. Stain, being thin, drips very easily. By starting at the top, you can do cleanup as you stain the lower pieces.
- Gel stains are one way around the “drippy” nature of stain. I have not had great success with them though.
- If possible, put your work piece parallel to the ground. Working on a flat surface almost eliminates runs (on reason why spraying cars is so difficult).
- If using a brush, use as broad a stroke as possible to even the distribution of the stain.
- When staining wood floors, old t-shirts work great to spread the stain, and you’ll be surprised at how easy it is.
- You don’t need a new foam brush each time you stain. If your staining efforts will span many days, wrap the brush in a plastic bag when you’re done. I’ve had brushes stay flexible for almost two days when wrapped tightly.
- Foam brushes
 are cheap, they don’t last forever. After a few uses you’ll find that the handle will dislodge from the brush. Never start a staining project without a spare brush handy. If you don’t have a spare and your brush breaks, it can be glued back together temporarily with wood glue (believe it or not).
 - Before you stain, it’s good to vacuum off your project, but even better to run a tack cloth across all surfaces to pick up any residual dust.
- If you don’t have a tack cloth, I’ve heard of folks that apply heavily diluted varnish or turpentine to a rag to create a poor man’s tack rag.
- If stained using two different methods – wiping and no wiping. With the wiping method, I’ll let the stain sit on the wood for a few minutes (to let the thinner evaporate), then wipe it off. With the no wipe method, I keep running the brush along the surface until the stain is evenly distributed, then I leave it. Both have worked well in the past.
- If you absolutely have to leave a dry edge, make it jagged, feather it out, or gradient it down. If you stop and leave a solid line, it will be very noticeable.
- Use a respirator. They are cheap, and it’s not worth the headaches you’ll have without one (not to mention other more serious problems). I personally use an organic vapor respirator.
- Stain goes a long way – I’ve never need more than one quart for any given project. Don’t buy two cans unless you have a very large project.
- Do not over sand if you are staining, Sanding creates nice “grooves” for the stain. If you sand any finer than 180 grit, you start eliminating the grooves necessary to hold stain.