
How many times have you wanted to spruce up your home or garden but didn’t want to deal with the maintenance that comes with it? Vinyl lattice is an excellent product that can be maintenance free if installed properly.
Before I detail how I prepped and installed my vinyl lattice, let me just point out a couple things:
- It seems that most manufacturers recommend installation with staples. I used very long finishing nails, which supporting the lattice just fine.
- It is also recommended that you “protect” any unfinished vinyl edges (where you have made cuts) by attaching a strip of wood. I did not do this, but instead opted to support the vinyl in a small dirt trench.
Cutting the Lattice
So you have this 32 sq. ft. sheet of wobbly vinyl, how on earth are you going to cut this in a controlled manner?!
When I originally starting researching this, I came across a few posts that suggested adding strips of wood to the lattice, then sending them through the table saw. What a hassle!
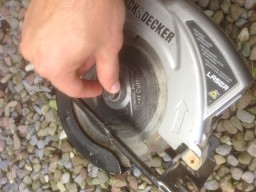 The easiest method of cutting vinyl lattice is to grab your circular saw, reverse the blade, and cut away! The reversed blade prevents the teeth from “chopping” through the vinyl, instead allowing the smoother surface of the blade to somewhat “melt” through it.
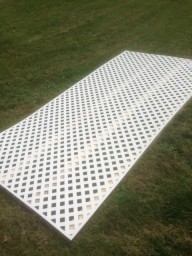 That’s simple enough, right. The next trick was figuring out how to position the lattice so I can run the circular saw blade across it. I decided to support the vinyl lattice on three 2x4s, evenly spaced on the ground. This would provide enough clearance for the circular saw blade.
This ended up producing very clean cuts, not to mention giving a little attention to the unused edge on my circular saw blade!
Fastening the Vinyl Lattice
Manufacturers suggest using staples, but that seems like overkill. You be the judge though, if your lattice will be vulnerable to strong weather conditions or other forces, staples will beat nails any day of the week.
I went with finish nails for two reasons: I had them already and their really easy to use!

How much lattice do I need?
You can do the math, or just use our lattice calculator to figure out how much lattice, how many finish nails and even how many cuts, time required and cost!
That’s it!
I might point out though that the lattice isn’t meant to cover imperfections. You might think that the tight diamond pattern would draw attention away from any marks or imperfections in the surface behind the lattice. It doesn’t. Spend a little time cleaning up the surface that you’ll be apply the lattice to beforehand.