Chairs have a tendency of getting wear and tear on their covers from being used heavily. Or sometimes, you just feel the need to change the covers of your chair to go with the decor or theme of your room. But the problem is that the cost of having your chair reupholstered is quite high.
If you are into handiwork, we have a solution for you: Why not reupholster the chair yourself? In this step by step tutorial, we’ll show you how to easily do so yourself at home.
Step 1. Get the Supplies
Before you start working on the project, you need to get the necessary supplies. Get the fabric that you want to cover your chair with. Make sure that you have enough fabric to cover all the sides. While taking this measurement, add 2 extra inches on each side and get the fabric accordingly.
You’ll also need a staple gun with ample staples inside, scissors, a hammer, and a screwdriver. A wooden work surface and a measuring tape are recommended too.
Step 2. Get Rid of the Old Fabric
Considering your chair has a fabric covering on it already, you can either remove it completely or cover it with the new fabric. However, we suggest you remove the old fabric covering the chair.
This task may be easy or difficult depending on what type of chair you have and how the cover has been affixed. Pull out the staples holding the old fabric in place with a hammer. However, be mindful as to not cause any damage to the chair itself.
Step 3. Take Measurements and Prepare the Fabric
Once you have removed the old fabric, it’s time for you to prepare the material. Put the fabric on the front side of the surface you want to cover. Here, you must ensure that not only is the whole surface covered, but there is extra fabric on all four sides. This will provide ample room for stapling the fabric to the backside of the chair’s surface.
In case your fabric is larger than the amount necessary, use your scissors to cut it from all sides according to the measurements. That’s important to make sure that the excess fabric does not create any unwanted bulk.
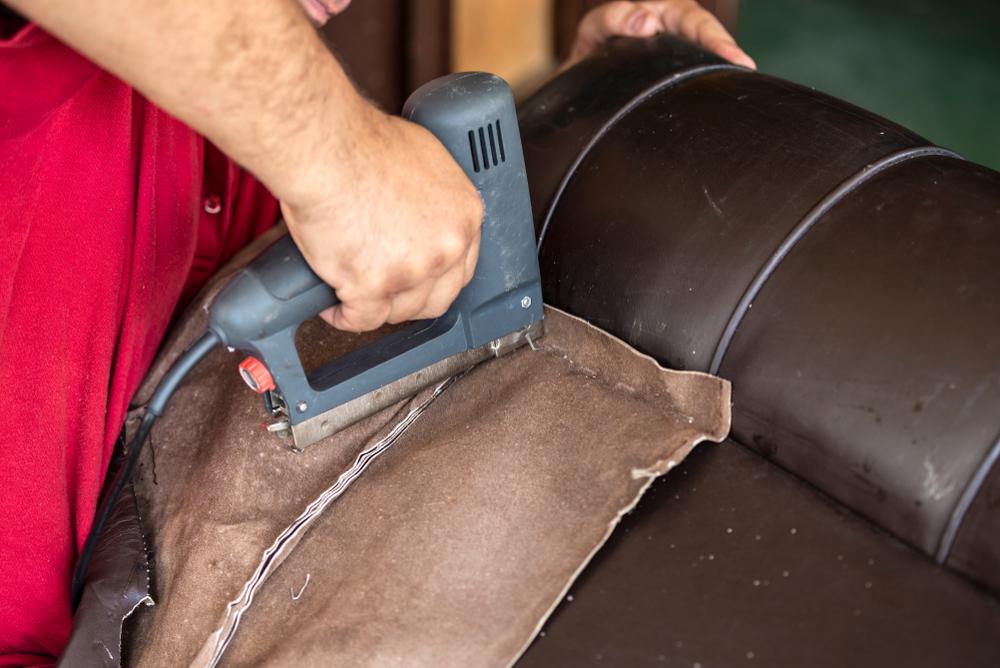
Step 4. Time to Staple!
Now that you have the fabric ready, it’s time to staple it to the chair. Put the fabric on the front side of the surface. For the top long side, put the excess 2 inches of fabric over the edge and pull it tightly from all sides to ensure that there are no folds or bunches anywhere.
When you’re happy with the positioning, start stapling the fabric to the chair, i.e. staple the 2-inch extra fabric to the backside of the chair. Put a few staples along the line but make sure to space them out evenly. We’d suggest you don’t put too many staples so as not to damage the surface’s material.
Step 5. Handle the Mishaps
Sometimes when you are using a staple gun, it might not be effective, i.e. the staple may not get pushed the whole way in as intended. This usually happens if you are unable to exert as much pressure on the staple gun as needed. As a result, the staple does not help in securing the fabric tightly on the surface.
If this happens, there are two things you can do:
- Hammer the staple in by using the hammerhead and hitting the staple repeatedly.
- Alternately, you can use the other end of the hammer to pull out the staple altogether and redo the stapling on that spot.
If you think that the staple has gone deep enough, use option A. Otherwise, use option B. Use your judgment in this case. The objective is to secure the fabric on the surface, so as long as that is being done, you’re good to go!
Step 6. Staple the Other Sides
Once you have attached the top long side, it’s time to secure the fabric along the lower long side. Pull the lower part of the fabric on the front side across the bottom edge similar to what you did in Step 4. Make sure that the fabric is taut and stretched amply. When it is perfectly positioned, staple the fabric to the backside of the surface.
Now that the top and bottom long edges are done, it’s time to move on to the left and right shorter edges. Follow the same process on these two sides as well, ensuring that they are tightly pulled and that the fabric is not loose.
The major task is now done. Take a look at all sides and make sure that there are no loose staples. If so, fix the error by following the processes described in Step 5.
Step 7. Take Care of the Corners
You might have noticed that we haven’t talked about the corners yet, but when you are working on the project, you’ll see those problematic corners with excess bunched up fabric. It’s time to take care of that.
To do that, pinch the spine of the corner and fold it in such a way that there is no other loose fabric. If there’s still some excess fabric left at the corner, you should cut it off with a pair of scissors. Otherwise, when you staple it, it will form an odd-looking bulk.
Once you’ve cut off the extra piece of fabric, staple the corner on the backside of the surface, similar to what you’ve done with the sides. Repeat this process for all 4 sides.
Step 8. Final Touches and Reinstallment
Examine your work properly. If the fabric makes any bubbles on the front side, pull it tightly, thus pushing out the air from underneath it, and then staple the corresponding end on the backside.
And you’re done!
But wait – your beautiful upholstered chair surface is ready but still needs to be reattached to the chair. Do so, and you’ll have a beautifully reupholstered chair that you made new with your own hands!
Final Thoughts
It’s a joy to take care of something at your home that needs fixing, especially if that means you get to save a lot of money! Reupholstering a chair is one such opportunity.
Now that you have reupholstered your chair, it’s time for you to relax. So, sit back on that chair and chill out. You’ve done a great job and deserve a break!