The past weekend I decided to take on a little porch refinishing project. Our porch had old and out-of-date paint color, not to mention that over 25% of the paint was either peeling or non-existent. Because of this, over the years, the boards have taken on a bit of water and started to cup and warp a little bit.
Why We Chose a Stained Finish
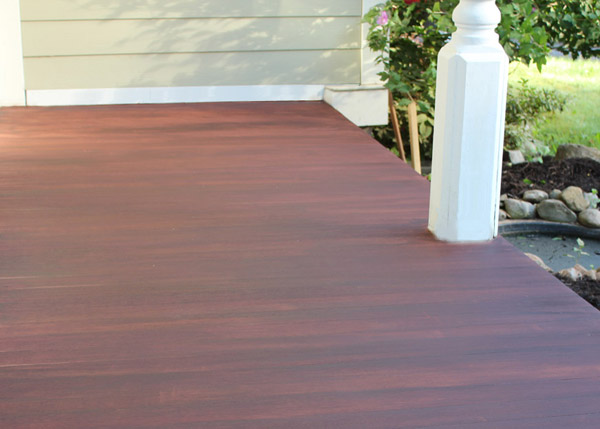
We decided to go with a stained finish. It allows the wood grain to show through and provides a smoother finish. On the downside, there’s a good chance we’ll need to refinish it a little sooner than if we had painted it. Given that, we had no choice but to choose a high quality stain that would last as long as possible. It was recommended that we go with a Behr Premium Weatherproofing stain, which was a little pricier than other brands, but hopefully worth the additional cost.
This wasn’t an overly involved project, but I decided to split it up into a two-day event.
Day 1: Stripping the old paint
Day 2: Sanding & applying the stain
Stripping
We used a paint stripper to remove the paint first. Not being sure whether the paint contained lead, I felt a little more comfortable removing it with a stripper, instead of sanding it off.
The stripping process wasn’t too bad. Flat surfaces such as flooring allow you to use a very liberal amount of stripper, which will do wonders when it comes to scraping off the paint. One of my friends suggested that I apply stripper to the entire wood surface, cover it with a sheet of thin plastic and let it sit for 1/2 hour before scraping it. I did not try this method, so it remains a mystery!
Sanding
The next day, I ran over to home depot to pickup a heavy-duty, square floor sander. If you’ve sanded your indoor hardwoods before, you may be asking why we didn’t go with an orbital sander for better sanding efficiency. The short answer is, our floor boards are uneven, which will cause the orbiting discs to snag on the boards and shred them up in the process. Home Depot would not be happy about this!
We picked up the floor sander for about $35, giving me 4 hours of rental time. The helpful rental guy suggested I start with a 24-grit sandpaper, then go to a 36-grit before finishing with a 60-grit. Having built cabinets before, I really questioned how course the 60-grit finish would look. Once I finished the third round of sanding with 60-grit, I realized that man was absolutely right, there was no need to go beyond 60-grit. It became even more evident after my wife and I applied the stain. There was no noticeable course texture at all, it looked smooth as glass.
If you do rent from home depot though, they will try to load you up on sandpaper, partly for your benefit so you don’t need to return to the store for more, but you have to imagine that they’re also hoping you use more than necessary before returning the sandpaper for a refund. I was able to do a great job on 72 square feet of flooring with just one piece of sandpaper for each grit.
After returning the floor sander, I picked up a 3-sheet sleeve of 60-grit sandpaper for use with my mouse sander. I just ran over the edges of the flooring where it touched the wall to make sure I removed all traces of paint stuck in the corners, as well as creating enough of a rough surface for the stain to drip onto. This is important. If you don’t sand the edges, you’ll find that the stain applies completely different around the perimeter of your deck.
Prepare the Surface for Stain
After sanding, I grabbed my air compressor and spent a few minutes blowing away all the dust. I should have used a large tack rag to clean up the surface even more, but I didn’t have one handy.
Regardless of the method you choose to remove the sanding dust from the wood, it’s important that you get rid of as much as possible. If you stain over sanding dust, it can either create a overly rough spot or simply look like there are small bumps in the wood.
Staining
There are other posts on this site that offer some staining tips. In short, just make sure you have a quality paint brush, practice on a separate piece of wood first, and don’t leave a dry edge.
I started with an old rag, then realized that, although it took a little longer, the staining process was much easier to control with a paintbrush.
Depending on how good you are with a paint brush, you might decide to use painter’s tape on the walls where the floor meets them. Stain is not easy to remove from surfaces that don’t have a high sheen (are course or unfinished). I’m absolutely terrible with a paint brush and would better off if my 3 year old daughter did the job! So, I used painter’s tape absolutely everywhere I could.