A contemporary flower box borrows it’s design from modern kitchen cabinet styles. Some have posts, columns or corbels, while others have raised panels or intricate moulding.
To a professional woodworker, these accents and techniques are just part of their skill set. But, we’re not professional woodworkers!
I’d like to approach this mini-project from the prospective of someone who doesn’t have the full arsenal of woodworking tools. Though, I would like to introduce you to a very affordable, simple and strong joinery technique called pocket hole joinery (if you aren’t already familiar). Pocket hole joining is a technique where the fastener itself remains hidden, but creates a strong butt joint. Butt joints, typically considered a weak and silly joint used only by the lowest of DIY amateurs, are given new life with pocket holes. More to come on that later.
Let’s get started.
Tools
- Power Drill
- Miter Saw or Circular Saw
- Table Saw or Circular Saw with a Rip Fence (Manufactured or DIY)
- Counterbit Set (or a single #6 counterbit)
- Pocket Hole System (optional, but highly recommended)
- Finish Nailer (optional, but highly recommended)
- Bar Clamps, spring clamps and a Clamping Square or a Right Angle Clamp (optional, but recommended)
- Thickness Planer (optional)
Materials
Approximate Cost: $30 – $50 per flower box (depending on box size).
- (3) 12″ x 16′ cedar boards (12 inch x 16 foot)
Length and amount depends on the size and number of boxes you want to build. I chose flower box sizes that made good use of 8ft. cedar boards with little waste. More on that later…
To produce three (3) flower boxes, we’ll need three (3) 12″ cedar boards. - Wood glue.
- 1 1/2″ wood screws or longer. Figure about 20 per flower box.
(drywall screws will work in a bind) - 1 1/4″ pocket hole screws. Figure about 24 per flower box.
(optional, but highly recommended) - 1 1/4″ finish nails – gauge to match your nail gun .
(optional, but highly recommended) - Quart of exterior wood stain.
- Foam brush or rag to apply the stain.
Step 1 – Making your cuts
I designed the flower boxes around 8ft. x 12″ cedar boards. My local 84 Lumber sells 16 ft. x 12in. cedar boards for $60. They were willing to cut them down to 8ft. at no charge because it wasn’t that busy when I bought them (I believe they normally charge $1 or $2).
Cutting them down to 8ft. makes them not only easier to load into your vehicle, but easier to work with in the workshop. It also makes the “cut math” a little easier.
Eight foot boards means three equal width flower boxes at 32″ (including trim).
The 12″ board width (11.5″ actual) allows us to create 10″ tall boxes while reserving extra material for the trim.
The Box Cuts
Cut List
(6) 30 1/4″ x 10″ pieces (for Front & Back)
(6) 11 1/2″ x 10″ pieces (for Sides)
(3) 29″ x 11 1/2″ pieces (for Bottoms)
Cut Process
- If you have 16 foot boards (you didn’t get them cut down to 8 foot boards), cut them in half (down to 8 foot). It’ll make the job easier.
- With your table saw or circular saw, rip a 10″ wide cut from four (4) of your 12″ Cedar boards. This will provide the material for the box itself (with leftover for the trim). Leave your last two (2) cedar boards at their full 11 1/2″ widths.
- Box Front & Back: With each of your two (2) 8 foot cedar boards, make 30 1/4″ cross cuts to produce a total of 6 pieces.
- Box Sides: With one (1) of your 8 foot cedar boards, make 11 1/2″ cross cuts to produce a total of 6 pieces.
- Box Bottoms: This is perhaps the easiest one of all. Simply take one of your 8 foot cedar boards and make three cross cuts at 29″. You’ll now have three equal 29″ x 11 1/2″ pieces for your box bottoms.
The Trim Cuts
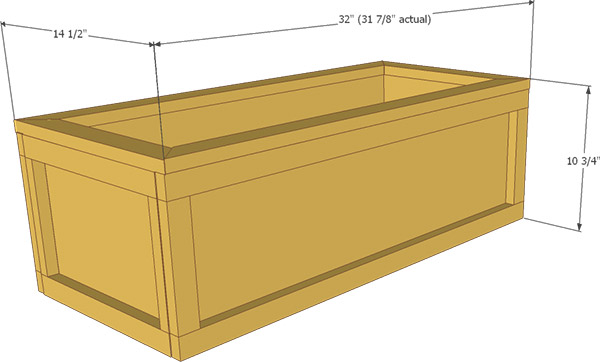
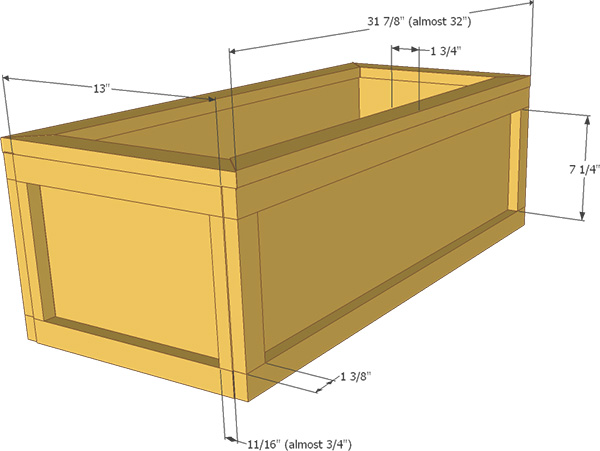
Let’s start with a diagram to help guide you:
Cut List
(12) 31 7/8″ x 1 3/8″ Trim Pieces (for Front & Back rails)
(12) 13″ x 1 3/8″ Trim Pieces (for Side rails)
(12) 7 1/4″ x 1 3/8″ Trim Pieces (for Front & Back stiles)
(12) 7 1/4″ x 3/4″ (11/16″ actual) Trim Pieces (for Side stiles)
(6) 31 7/8″ x 1 3/4″ Trim Pieces (for Top)
(6) 14 1/2″ x 1 3/4″ Trim PIeces (for Top)
Cut Process
After you make the cuts for the box itself, you’ll have a 8 x 1 3/8″ piece of trim left over from each of the 3 boards. This will leave you with 24 feet of 1 3/8″ trim (taking away 1/8″ for the width of your saw blade). With one of the remaining 8 foot boards, you’ll have a total of 88 feet of trim. Seems like a lot, but you’ll need it!
It’s also likely you’ll need to tap into your 6th remaining 8 foot board for a couple feet of trim if you run out of material. I know I did.
- With your remaining 8 foot board, rip 4 strips at 1 3/8″ each. This will provide an additional 32 feet of 1 3/8″ trim.
- Now, rip 3 strips at 1 3/4″ each. This will be used for the top trim.
- Front & Back Trim Rails (Horizontal): Make 12 cross cuts on the 1 3/8″ trim, each at 31 7/8″. This will allow us to get 3 cuts from each 8 foot piece.
- Side Trim Rails (Horizontal): Now, make 12 cross cuts on the 1 3/8″ trim, each at 13″.
- All Trim Stiles (Vertical): Make 18 cross cuts on the 1 3/8″ trim, each at 7 1/4″.
- The Side Trim Stiles: Now, take 6 of those 7 1/4″ pieces you just cut, and rip them right in half on your table saw – creating a total of 12 7 1/4″ pieces that are almost 3/4″ wide (11/16″).This step is what makes this project easy. We’re skipping out on ripping a miter angle down all of the trim stiles, and instead butt joining the vertical trim together at the corners.
- The Top Trim: Finally, with the 1 3/4″ trim that you ripped earlier, make six (6) cuts at 31 7/8″ and six (6) cuts at 14 1/2″. If you run out of wood, just fall back on that 4″ x 8′ cedar board you purchased separately.
- Now, you need to miter the top trim cuts. Set your miter saw at 45° and cut a miter into each top trim board. Make sure you cut in the correct direction, so as to create a square from two of the 14 1/2″ pieces and two of the 31 7/8″ pieces.
Now that you have all your tools, materials and cuts done, let’s move on to:
DIY Flower Box Part II – Assembly »