Tag Archives: flower box

Flower Box

DIY Flower Boxes Part II – Assembly

Last Updated

If you’ve already followed the Flower Box Part I article, you have all of your flower box and trim pieces cut to the appropriate width and length and are ready to begin assembly.

It’s usually preferable to make all of your cuts first, as it allows you to get into a rhythm not only on the cutting but on the assembly as well.

Step 1 – Countersinks & Pilot Holes

If you only have one drill, it’s typically easier to drill all your countersinks and pilot holes in one step, then insert your fasteners (screws) in another step.

If you have a counter bit, great! Tighten it up in your drill. If not, you’ll have to do this in two steps, one with your counter sink and the other with your pilot bit.

  1. Drill a total of 13 counterbit holes in each of your 30 1/4″ x 10″ front/back pieces that we cut in part I.
  2. Drill a total of 3 counterbit holes in each of your 11 1/2″ x 10″ side pieces that we cut in part I.

See the diagram below.

flowerbox assembly

The side of the board that you drill the counterbit holes in will be the visible side (the screws will be covered up with trim). So make sure you choose the side that is most aesthetically pleasing for each board.

Step 2 – Assemble the box (glue & screw)

Now that you have everything cut and predrilled, simply assemble all three boxes with your 1 1/2″ screws!

The best way to do this is to piece together and glue all sides of the box. Clamp the box in place with bar clamps and start screwing it together.

Step 3 – Assemble the face frames (trim)

The technique I recommend to assemble the face frames is called pocket hole joinery. This technique provides adequate strength for smaller projects while hiding the fasteners “behind” the visible face of the wood. I provide more detail here on pocket hole joinery.

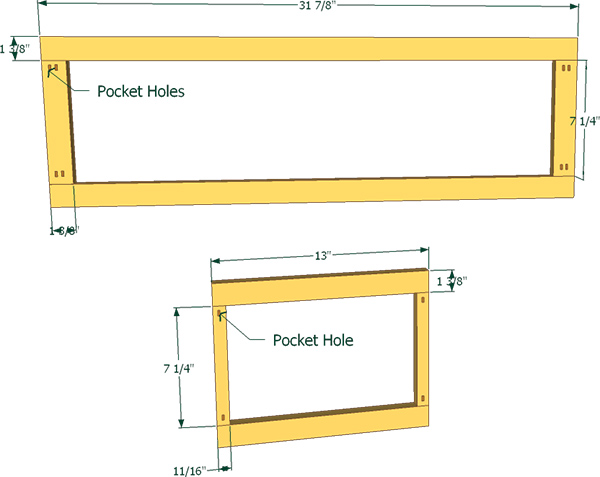
Now that you have all of your trim cut, this step is relatively easy. See the diagram below for pocket hole placement and trim assembly.

  1. Use your pocket hole jig to create 4 pocket holes (2 on each edge) in each of your 7 1/4″ x 1 3/8″ trim pieces.
  2. Then create 2 pocket holes (one on each edge) in each of your 7 1/4″ x 11/16″ trim pieces.
  3. Clamp the trim frames together as shown below with your bar clamps.
  4. Insert your pocket 1 1/4″ pocket hole screws and drive them in with your cordless drill.
  5. Important: Cedar is a soft wood. It’s easy for your pocket hole screws to blow out through the face of your trim. Make sure your power drill is set on one of the lower torque settings. This is also the reason I chose 1 1/4″pocket screws over 1 1/2″ ones.

flower box trim assembly

Step 4 – Attach the trim to the box

There are a number of ways to attach trim to a box. Cabinet makers often prefer to use biscuit joiner, which involves creating a few small football-shaped “grooves” in the back of the trim and the box itself. Then, gluing a biscuit into both grooves.

While this technique is clean and precise, it requires the use of a biscuit joiner, which is not part of most people’s toolset.

The easier approach is to simply glue the frame on the box, then fasten it with finish nails. The finish nail holes will hardly be visible once the project is complete. Especially if you spend a few extra minutes filling the holes with wood putty before you stain the box.

Step 5 – Assemble the top trim (cap)

The next step is to assemble the top trim using the same pocket hole method as with the side trim.

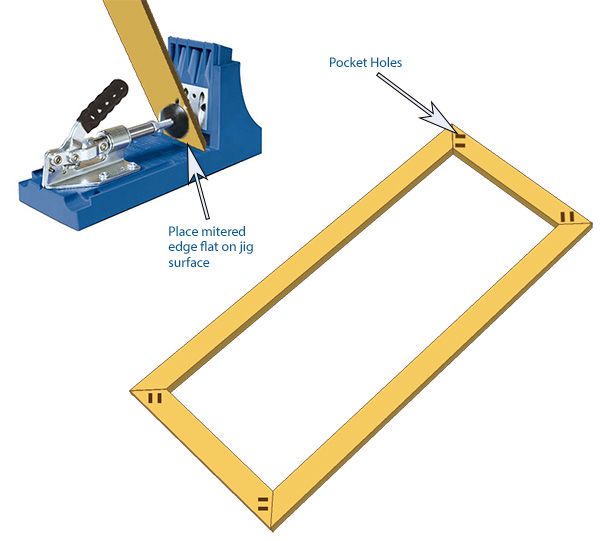
The difference being that the edges are mitered. This presents two minor challenges:

  1. You have to be a little more precise with the placement of your pocket holes.
  2. It’s more difficult to bar clamp the pieces together, as the mitered edges will tend to “slide” apart.

The first one is easily solved by simply placing the mitered edge flat on your pocket hole jig when drilling the holes. See the image below:

flower box top trim

The clamping problem is solved with the use of clamping squares (as mentioned in the Tools section of part one).

By clamping a square at each corner as you insert the pocket hole screws, it’s easier to ensure that the two mitered corners stay together while fastening.

Step 6 – Attach the top trim

We’ll use the same method that we used to attach the side trim. That is:

  1. Glue
  2. Clamp
  3. Finish nail

Step 7 – Stain the finished box

For your stain choice, you’ll want a penetrating oil based stain. It will peel less over time. Penetrating stains get deep into the wood instead of resting on the surface.

That being said, your method of application can play a factor in how deep the stain penetrates.

Spraying stain may be easy, but it doesn’t really allow the stain to seep deep in the wood. A brush is typically the best way to apply penetrating stain.

Step 8 – Enjoy!

Give your new flower boxes a few hours to dry after staining, then load them up with potting soil and start planting!

P.S. it is up to you whether or not you choose to put gravel at the bottom of your flower boxes. Some say that it overcrowds the plants, while others say that the drainage is necessary.

The good news is that you now have three boxes to experiment with!

Tumblr
Pinterest


Just one more thing…we're inviting 5 new DIYers to our Become an Author program. Write articles just like this one and earn a little pocket money at the same time! Learn more »

Flower Box

DIY Flower Boxes – A fun woodworking project for any skill level

Last Updated

A contemporary flower box borrows it’s design from modern kitchen cabinet styles. Some have posts, columns or corbels, while others have raised panels or intricate moulding.

To a professional woodworker, these accents and techniques are just part of their skill set. But, we’re not professional woodworkers!

I’d like to approach this mini-project from the prospective of someone who doesn’t have the full arsenal of woodworking tools. Though, I would like to introduce you to a very affordable, simple and strong joinery technique called pocket hole joinery (if you aren’t already familiar). Pocket hole joining is a technique where the fastener itself remains hidden, but creates a strong butt joint. Butt joints, typically considered a weak and silly joint used only by the lowest of DIY amateurs, are given new life with pocket holes. More to come on that later.

Let’s get started.

Tools

  1. Power Drill
  2. Miter Saw  or  Circular Saw
  3. Table Saw  or  Circular Saw with a Rip Fence (Manufactured or DIY)
  4. Counterbit Set (or a single #6 counterbit)
  5. Pocket Hole System (optional, but highly recommended)
  6. Finish Nailer (optional, but highly recommended)
  7. Bar Clamps, spring clamps and a Clamping Square  or  a Right Angle Clamp (optional, but recommended)
  8. Thickness Planer (optional)

Materials

Approximate Cost:  $30 – $50 per flower box (depending on box size).

  1. (3) 12″ x 16′ cedar boards  (12 inch x 16 foot)
    Length and amount depends on the size and number of boxes you want to build. I chose flower box sizes that made good use of 8ft. cedar boards with little waste. More on that later…
    To produce three (3) flower boxes, we’ll need three (3) 12″ cedar boards.
  2. Wood glue.
  3. 1 1/2″ wood screws or longer. Figure about 20 per flower box.
    (drywall screws will work in a bind)
  4. 1 1/4″ pocket hole screws. Figure about 24 per flower box.
    (optional, but highly recommended)
  5. 1 1/4″ finish nails – gauge to match your nail gun .
    (optional, but highly recommended)
  6. Quart of exterior wood stain.
  7. Foam brush or rag to apply the stain.

Step 1 – Making your cuts

I designed the flower boxes around 8ft. x 12″ cedar boards. My local 84 Lumber sells 16 ft. x 12in. cedar boards for $60. They were willing to cut them down to 8ft. at no charge because it wasn’t that busy when I bought them (I believe they normally charge $1 or $2).

Cutting them down to 8ft. makes them not only easier to load into your vehicle, but easier to work with in the workshop. It also makes the “cut math” a little easier.

Eight foot boards means three equal width flower boxes at 32″ (including trim).

The 12″ board width (11.5″ actual) allows us to create 10″ tall boxes while reserving extra material for the trim.

The Box Cuts

Cut List

(6) 30 1/4″ x 10″ pieces (for Front & Back)
(6) 11 1/2″ x 10″ pieces (for Sides)
(3) 29″ x 11 1/2″ pieces (for Bottoms)

Cut Process

  1. If you have 16 foot boards (you didn’t get them cut down to 8 foot boards), cut them in half (down to 8 foot). It’ll make the job easier.
  2. With your table saw or circular saw, rip a 10″ wide cut from four (4) of your 12″ Cedar boards. This will provide the material for the box itself (with leftover for the trim). Leave your last two (2) cedar boards at their full 11 1/2″ widths.
  3. Box Front & Back: With each of your two (2)  8 foot cedar boards, make 30 1/4″ cross cuts to produce a total of 6 pieces.
  4. Box Sides: With one (1) of your 8 foot cedar boards, make 11 1/2″ cross cuts to produce a total of 6 pieces.
  5. Box Bottoms: This is perhaps the easiest one of all. Simply take one of your 8 foot cedar boards and make three cross cuts at 29″. You’ll now have three equal 29″ x 11 1/2″ pieces for your box bottoms.


The Trim Cuts

Let’s start with a diagram to help guide you:

flowerbox trim

Cut List

(12) 31 7/8″ x 1 3/8″ Trim Pieces (for Front & Back rails)
(12) 13″ x 1 3/8″ Trim Pieces (for Side rails)
(12) 7 1/4″ x 1 3/8″ Trim Pieces (for Front & Back stiles)
(12) 7 1/4″ x 3/4″ (11/16″ actual) Trim Pieces (for Side stiles)
(6) 31 7/8″ x 1 3/4″ Trim Pieces (for Top)
(6) 14 1/2″ x 1 3/4″ Trim PIeces (for Top)

Cut Process

After you make the cuts for the box itself, you’ll have a 8 x 1 3/8″ piece of trim left over from each of the 3 boards. This will leave you with 24 feet of 1 3/8″ trim (taking away 1/8″ for the width of your saw blade). With one of the remaining 8 foot boards, you’ll have a total of 88 feet of trim. Seems like a lot, but you’ll need it!

It’s also likely you’ll need to tap into your 6th remaining 8 foot board for a couple feet of trim if you run out of material. I know I did.

  1. With your remaining 8 foot board, rip 4 strips at 1 3/8″ each. This will provide an additional 32 feet of 1 3/8″ trim.
  2. Now, rip 3 strips at 1 3/4″ each. This will be used for the top trim.
  3. Front & Back Trim Rails (Horizontal): Make 12 cross cuts on the 1 3/8″ trim, each at 31 7/8″. This will allow us to get 3 cuts from each 8 foot piece.
  4. Side Trim Rails (Horizontal): Now, make 12 cross cuts on the 1 3/8″ trim, each at 13″.
  5. All Trim Stiles (Vertical): Make 18 cross cuts on the 1 3/8″ trim, each at 7 1/4″.
  6. The Side Trim Stiles: Now, take 6 of those 7 1/4″ pieces you just cut, and rip them right in half on your table saw – creating a total of 12  7 1/4″ pieces that are almost 3/4″ wide (11/16″).This step is what makes this project easy. We’re skipping out on ripping a miter angle down all of the trim stiles, and instead butt joining the vertical trim together at the corners.
  7. The Top Trim: Finally, with the 1 3/4″ trim that you ripped earlier, make six (6) cuts at 31 7/8″ and six (6) cuts at 14 1/2″. If you run out of wood, just fall back on that 4″ x 8′ cedar board you purchased separately.
  8. Now, you need to miter the top trim cuts. Set your miter saw at 45° and cut a miter into each top trim board. Make sure you cut in the correct direction, so as to create a square from two of the 14 1/2″ pieces and two of the 31 7/8″ pieces.


Now that you have all your tools, materials and cuts done, let’s move on to:

DIY Flower Box Part II – Assembly »


Tumblr
Pinterest


Just one more thing…we're inviting 5 new DIYers to our Become an Author program. Write articles just like this one and earn a little pocket money at the same time! Learn more »