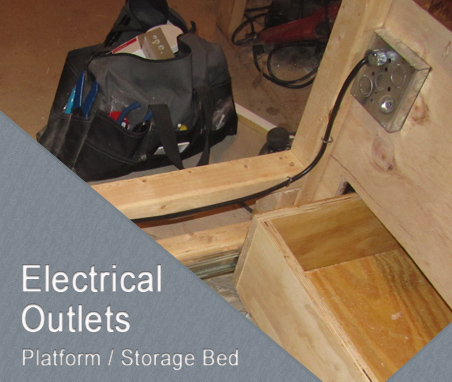
I knew adding outlets to the bed frame would give “power naps” a whole new meaning, so I couldn’t resist!
Before we dig in, let’s start with a disclaimer:
I am not a licensed electrician. I'm familiar with the National Electric
Code (NEC), but do not by any means know or understand all of the codes within.
Some codes are specific to your town or state. I don't make any claims to the
safety of the my installation methods, nor that they fully comply with the NEC.
This post is meant as an inspirational guide only and should not be acted on
without consulting the NEC or a qualified and licensed electrician.
The NEC’s primary concern is safety, so I’ll attempt to offer safe installation methods. I do, however, encourage comments from professional electricians where something could or should be done differently. Give me your worst!
Rough Electrical
The first step was to determine which electrical box would be suitable for this project. I unfortunately could not locate a plastic box that was shallow enough to prevent the mattress from resting against it. I did find a 4×4 metal box though, but we are required to ground it.
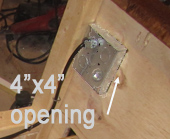 After determining that the 4×4 metal box was the way to go, I used a jigsaw to cut a 4″ x 4″ opening in each frame side. You’ll want this opening to be flush to the 2×3 stud in the rear, so you have something substantial to mount the box to.
From my understanding of the NEC, since you are putting the box inside a wooden opening, it needs to be perfectly flush with the surface of the frame. If putting a box in drywall, you are afforded more flexibility.
I used wood screws to secure the box to the frame, being unable to site a specific code that disallows wood screws (it may exist, I just couldn’t find it).
Securing the wire
In this step we’ll secure the wire going into the box and also ground the box. For the power feed to the box, I choose replacement power cords from Amazon. They are 14/3 cords, so they’ll work with a 15 Amp electrical outlet.
I am not certain that this type of sheathing complies with the NEC for use in a furniture project, so you may wish to double check that.
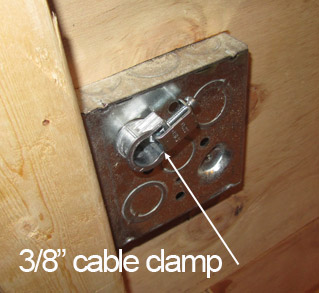 Using a replacement cord allows us to “plug” our bed outlets directly into a home outlet. The first step is to punch out one of the knock out holes on the back of the metal electrical box, then insert a cable clamp in it’s place. The exact part you’re looking for is a 3/8″ saddle connector.
Once you’ve done that, insert the unsheathed end (which has the 3 wires hanging out) through the clamp and into the box. When you screw the clamp down on the wire, be sure that it is completely clamping onto the sheathed part of the wire. In other words, the black outer sheathing should completely pass through the clamp.
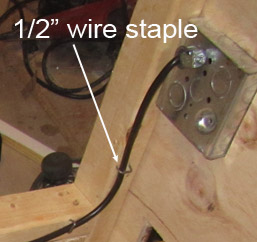 Then, be sure to secure the wire along the bed frame with staples. The NEC does have guidelines on this. Last time I checked, you had to staple within 8″ of the box itself, then every 4 feet. I stapled every 12 inches since it’s such a small run. This is extremely important, not only for code, but to ensure that the drawers don’t hit the wire as they slide in and out.
You don’t need to crush the wire with the staple, just enough to keep it somewhat snug against the frame.
Depending on the length of your replacement cords, you may choose to install the power strip first, so you can make sure it’s in a location that’ll be accessible to both replacement cords. You could, optionally plug both replacement cords directly into a wall outlet, but I chose to install a power strip directly on the bed frame, then plug that into a single wall outlet.
Finish wiring
Now for the tricky part. Here’s another reminder that I’m not an electrician and am not fully aware of the most recent revision of the National Electric Code. Proceed at your own risk and consult the NEC whenever possible.
 I decided to add one switch and one outlet to each side of the bed, hence the 4″ square electrical box. The switch will control the lower of the two outlets.
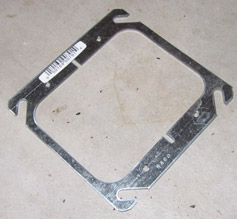
Before you get started, we’ll need to add an adapter to our metal box, which allows us to attach the receptacle and switch. The adapter plate shown to the right just screws directly to the box.
After that, make sure you have a green grounding screw attached the box (if using a metal box). If you’re looking at the box and notice a “bump” in the back of it, that’s where the grounding screw goes. You can purchase grounding screws at your hardware store. I did not have one handy, so I just grabbed one from a spare electrical outlet.
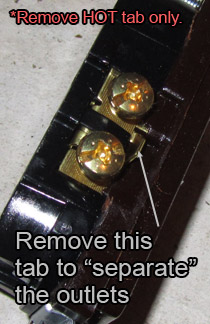 If you’ve ever looked at a receptacle, you may be wondering how you can have a switch control only one of the outlets. Most outlets have a “tab” that we can grab with a pair of needle nose pliers and remove, which essentially separates the outlets electrically. We only want to remove the HOT tab. The neutral (white wire) tab needs to stay intact (otherwise we’ll need to run two neutral wires to the outlet).
Once we do this, we’ll have to supply power (black wire) to each outlet. One black (hot) wire will come directly from the power source (replacement cord). The other black wire (hot) will come from the switch. This guide may help:
From Replacement Cord:
Ground Wire (unsheathed copper): Goes to metal box itself, switch and receptacle (green screws).
Hot Wire (black): Goes to upper outlet and switch.
Neutral Wire (white): Goes to receptacle (just one outlet, since we did not remove the tab).
From Switch:
Second Hot Wire: Goes to lower outlet.
You’ll need wire nuts to connect the wires together. My advice would be NOT to use the ones with “wings” that assist in turning the nut. These take up a lot of room in the box. Go with the “wingless” wire nuts.
After you’re done with the finishing wiring, screw on your outlet wall plate and test your finished work!
This completes the platform bed post. Carry your bed components to your bedroom, screw them together, and enjoy!
Do you have a link to one of those cords that “plugs” into the new outlet? I want to build outlets into a head board but do not want to run wiring out of the wall. I want to just be able to plug into a house outlet.
Thanks
Was this what you were looking for?
http://www.amazon.com/dp/B001OOMNAQ/ref=as_sl_pd_tf_lc?tag=amateurdiy-20&camp=213381&creative=390973&linkCode=as4&creativeASIN=B001OOMNAQ&adid=01XK9JK831P7WG6TTBN2&&ref-refURL=http%3A%2F%2Fwww.amateurdiy.com%2Fwoodworking%2Fplatform-storage-bed%2Fbed-frame-electrical-adding-outlets%2F
Do you have a link to one of those cords that “plugs” into the new outlet? I want to build outlets into a head board but do not want to run wiring out of the wall. I want to just be able to plug into a house outlet.
Thanks