We had purchased our home about 5 years ago, as naive young home buyers who had no clue what kind of work was ahead. The home was located in a great neighborhood, top-notch school system, and even had a little bit of land. The only downside was the house itself! Only about half of it had finished floors, the roof was in terrible shape, the kitchen was about 50 square feet, you get the picture.
Four years later, we’ve made progress – a kitchen addition, new pool, new floors, some furniture, enough to make it feel like a place where we can raise our kids. It was starting to look like a new house, at least the downstairs.
So, a few weeks ago, my wife, Jenn, gently reminded me that the upstairs still kinda looked like it did the day we bought the house. So we put in some new carpet, which was enough to satisfy us for the time being. A couple more weeks go by and Jenn started to get that “unfinished” feeling again, and I couldn’t blame her. The new carpet was great, but we still had furniture that our parents had given us, which no doubt was given to them by their parents. We decided that a new platform bed would provide enough visual appeal to make up for the old furniture, while also adding additional storage.
So, we start researching beds, and sticker shock hits hard. For what we wanted, we would have to drop about $2,500 at the low end. We decided to make it a Christmas present to each other to offset the cost a little bit. But, before we made the final decision, our roof started to leak – bad enough that it was dripping down a few of our walls. The choice was clear, the roof had to be replaced, and the bed put aside for another year.
The roof was replaced. Our bed fund was depleted. A few days later Jenn asked me how difficult I thought it would be to build a bed. I had built our kitchen cabinets a couple years before, so I had the tools and some knowledge. I decided to take on the project, expecting that we could build the bed of our dreams for about $300.
Wish List
After looking at some photos of high-end beds, we came up with a wish list:
- Shaker style
- 4 deep drawers, 2 on each side, which would span most of the platform depth.
- 4-panel headboard
- 4-panel footboard
- Zero-clearance – no space underneath the platform
- King-size frame
- Stained to match our existing furniture
Planning
As I mentioned before, we wanted to keep the bed project on a budget of around $300. So we knew we’d have to cut a few corners. Besides the budget, we had a couple other requirements.
- The bed is a rectangle, so we had width and depth specifications.
- It’s an old house, so the hallways and doorways are tight. We had to build it in two pieces.
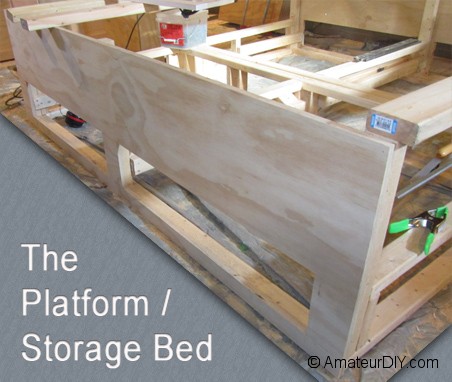
- We are not bodybuilders, it had to be light enough to carry upstairs! We’ll opt for 2×3 boards to construct the frame. It will be lighter than if we use 2x4s and more durable than 3/4″ plywood.
- Solid wood is expensive. We will use it for the drawer faces, headboard and footboard stiles and rails, and in a couple other finishing aspects. The majority of the bed will be cabinet-grade plywood. The edges of the plywood will be finished with solid wood.
- The headboard and footboard need to be attached after the bed is in it’s final place in our bedroom, as they can’t be split into two pieces without introducing a visible “seam”.
- To make the drawers deeper, we have to make the bed higher, as they will accommodate the space between the floor and the bottom of the box spring.
- The headboard and footer board need to be as wide as the finished width of the platform.
Project Outline
I typically like to outline the project steps before I start work. This is what I came up with:
- Take box spring/mattress measurements. These measurements alone will determine the width and depth of the frame.
- Decide on drawer height. This measurement alone will determine the height of the frame.
- Build the frame with 2×3 boards. The frame will be built as 2 identical “half-frames”, so they can be carried up stairs and through doorways.
- Cut the finished sides from cabinet-grade plywood and attach them to the sides of the frame.
- Cut drawer “slots” out of the finished sides.
- Cut backing for headboard and footboard from plywood.
- Build the drawer boxes.
- Start the solid wood. Rip most boards to 2 1/2″ width, some to 3 1/2″.
- Cross-cut solid wood to lengths required by drawer fronts, headboard and footboard panels.
- Fasten solid-wood frames together with pocket-hole joinery.
- Attach frames to drawers and headboard/footboard panels with a combination of biscuit and pocket-hole joinery.
- Attach drawer slides and drawers.
- Sand, stain, polyurethane all parts.
- Carry the frame and separate head/footboard upstairs to bedroom.
- Attach headboard and footboard.
With the plan and outline in place, it’s time to start construction…