Author Archives: diy

Food / Cooking

The Outdoor Griddle – 4 Reasons It Will Make Your Summer

Last Updated

For the past year, we have been using an old three burner grill that came with our home. The grates were so rusty that occasionally, we’d lose a hot dog in the cooking process.

But if we were careful, we could produce decent looking grill food as long as we were okay with the occasional burnt hamburger patty.

Three weeks ago we finally decided that we’ve lost enough meat to that old grill and visited Lowe’s to check out their line of Char Broil and Weber grills.

After about 20 minutes, we came to a decision on a Char Broil grill with four burners and all the bells and whistles, such as infrared and porcelain-coated grates.

The Outdoor Griddle

We were happy, just not excited…having simply replaced our old grill with a newer one.

While paying for our grill, we happened to notice a very large griddle surface sitting on top of a grill stand.

A million ideas ran through our heads, as far as all the various foods we could now cook outdoors with a griddle surface.

As it turns out, we were not wrong! More on that below…

We wanted to stick with the Char Broil brand to match the grill we purchased, so we hopped on Amazon and found their outdoor grill product. We made the purchase for about $300.

Assembly took about an hour and it took maybe a total of 90 minutes to season the griddle surface. After that, we were good to go!

Note: Blackstone also makes a griddle. It’s carried by Lowe’s, but we found a better deal on Amazon for the 36″ griddle. We would have purchased the Blackstone had we not been trying to match our existing charbroil grill.

Griddle Crepes

For me, a crepe is just a really thin pancake. So whip up your pancake batter the way you normally do, but thin it out a little bit with some milk.

griddle crepes

Make sure your griddle is nice and hot, then pour on a thin coat of batter. After about 30 seconds, add your filling (apples or berries work great) right in the middle of your crepe. Fold the sides inward, then cook to completion.

The best part is, if you cook it a little uneven, you can cover up any dark spots with whip cream!

Hibachi (with or without the tricks)

hibachi outdoorYou don’t need to have a 20 square-foot cooking surface and three months of training to whip up some hibachi for your friends.

If you’ve ever gone out for hibachi, you’ll notice that much of the cooking surface goes unused by the chef. You’ll find that a 36 inch griddle surface is more than enough for an 8-10 person meal.

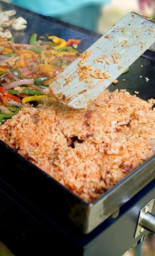
A well seasoned outdoor griddle surface is perfect for cooking steak, chicken, shrimp, rice with egg and vegetables.

The trick here, as with most griddle-cooked meals, is to make sure the surface is up to temperature before you start cooking. This can take up to 15 minutes from the point you turn on the burners.

Here’s a quick look at a couple of us cooking some hibachi vegetables, rice and chicken.

Grilled Cheese for 25!

Let’s not forget the kids. If you’re hosting a birthday party, you’ve now got the power to cook 25 grilled cheese sandwiches at the same time!

And let’s face it, the name “Grilled Cheese” really lends itself more to being cooked outdoors.

Tip: If you’ll be adding a slice of meat to your grilled cheese, you can preheat that slice right on the griddle.

Fish Tacos

Tilapia is a great low-fat, high-protein fish. And its relatively low cost makes it perfect for tacos.

There’s no need to break out your measuring cup for this one. Just toss a spoonful each of these spices into a bowl:

  • Chili Powder
  • Cumin
  • Paprika
  • Garlic Powder (half spoon)
  • Onion Powder (half spoon)

Mix ’em together, then rub them on your thawed tilapia (both sides). And let’s be honest, if you’re missing one of those spices, only the most prestigious of seafood critics is going to notice!

Toss those tilapia on a nice hot griddle for 4-minutes per side.

Once cooked, dice them up right on the griddle and drop them in your taco shells. Top with tomatoes, shaved carrots, lettuce and a creamy dressing or sauce.


Final Words

The outdoor griddle brings a lot more to the outdoor cooking experience than your traditional grill. You don’t have to worry about scratching up your grates. You can clean it by scraping it with your spatula, and pushing the leftovers right into the built in trash “hole”.

You can get one on Amazon for under $300. At time of writing, there aren’t many options, but the options that do exist seemed to be rated well.

Tumblr
Pinterest


Just one more thing…we're inviting 5 new DIYers to our Become an Author program. Write articles just like this one and earn a little pocket money at the same time! Learn more »

Workshop / Tools

Finish Nailer Review – 4 Things to Know Before You Buy

Last Updated

You decided to take on a remodel project yourself. Everything is going great and you’re just about finished. You’ve got your drywall finished and primed, your flooring installed and it’s time for trim. So you break out your hammer and finish nails and start nailing down the first board.

Your first drive of the hammer feels great, this is going to be a breeze! Your second drive bends the nail a little bit. No problem, “I can correct this with a gentler strike at a different angle.” The finish nail now is now completely bent out of shape. You grab the claw of your hammer and yank the nail out.

Let’s try that again.

It’s a little easier this time as the nail hole has been partially carved out by the previous nail. You get a little further this time, but inevitably, the nail bends again! “It can’t be this hard. There’s so much trim in my house, the builder must have glued it all on!”

The Finish Nail Gun

Most builders and woodworkers possess a tool called a finish nail gun. Typically, it’s a pneumatic tool (connects to an air compressor) that makes easy work out of driving finish nails through wood with just the right amount of force. After learning this, you might be tempted to go out and buy the cheapest finish nailer you can find. But there are a few things to know first…  

Angled vs. Straight

If you’ve already price shopped a little bit, you’ve come to find out that angled finish nailers are a bit more expensive. Don’t let that fact fool you into thinking that they’re the superior choice for every job.

finish nailer angle straight

Let’s look at some of the key differences:

  Angled Straight
Price More Expensive
If you plan on heavy use, or furniture building (cabinets, for example) – consider a high-quality angled nailer.
Less Expensive
If you need to install 5 pieces of trim in your living room – save your money and purchase a low-cost straight nailer.
The nails for straight nail guns are typically less expensive than their angled counterpart.
Design More Flexible
The slanted nature of the magazine makes angled nailers ideal for shooting nails into tight spaces. 
Less Flexible
The lower price comes at a cost. That cost is flexibility. The straight magazine tends to get in the way if you’re trying to drive a nail into a tight spot.
Application Cabinets & Other Construction
Angled nailers are typically considered a more durable way to fasten, as the nails are larger and the nail head is more pronounced.
Trim Work
The higher gauge nails (thinner) that typically go along with straight nailers are ideal for trim and other detail work that require not only that the nail head to be hidden (smaller nail head), but also a reduce chance of splitting the wood with a larger nail.


Brad vs. Finish Nailer

When we talk about brads, we’re referring to very thin nails (18-gauge or thinner) with very small heads. Brads are ideal for very light trim work, like shoe molding, where splitting can easily occur.
Brad nailers are very cost-effective, getting down to $20 for a low-end product.

Finish nails are larger (16-gauge or larger) and fasten better than brads, but they require you to fill the nail hole, if it’s visible. Whereas brads often don’t require any filling.


Electric (Cordless) vs. Pneumatic

Let’s talk about the two different ways nail guns are powered. The first, and less common, is the electric nailer.

Electric nailers are the clear choice for convenience. They don’t require another tool to power them (air compressor) and you aren’t restricted by the length of an air hose. You also won’t be slowed down waiting for an air compressor to refill.

So why would anyone purchase an air-powered pneumatic nailer? Three reasons:

    • Smaller
    • Lighter
    • Cheaper

Since air tools are powered by a compressor, much of the complexity within the tool is removed.

If you already own an air compressor or plan on purchasing more than one nailer, the pneumatic option is likely the best choice for you.


Exhaust

The direction of the exhaust is a seldom thought about feature when it comes to the purchasing decision process. Exhaust refers to the air that is expelled from the gun when firing a nail. A poorly located exhaust could lead to dust being constantly blown in your face!

It seems that most nail guns have forced the air exhaust out through the back, which is great, though not perfect. A nice feature of some nail guns is the ability to adjust the direction of the exhaust away from you or your work piece. 


My Choice

I’ve been using the DeWalt 51257 (pictured at the top of this post) for almost 8 years now. I’ve gone through thousands of nails, using it to build cabinets, install exterior and interior trim and many other projects.

The gun will accept a 16-gauge nail between 1″ and 2 1/2″ in length. It almost never jams and has an adjustable rear exhaust. It’s absolutely one of my top 5 favorite tools.

I bought it at home depot 8 years ago for over $200, but it looks like Amazon now has it in the $150 range.


Tumblr
Pinterest


Just one more thing…we're inviting 5 new DIYers to our Become an Author program. Write articles just like this one and earn a little pocket money at the same time! Learn more »

Quick Tips

How to Measure Your Own Radon Levels

Last Updated

Back in 2016, I wrote an article on the process of constructing your own DIY Radon Mitigation system. Since then, I’ve had a number of friends and relatives ask me not how they would go about mitigating their radon, but rather how I measured it. Considering the success of my article on mitigating the radon, I thought I’d write a more basic how-to on measuring your radon level by yourself (without hiring a professional). Of course, this comes along with the usual disclaimer that I am not a radon mitigation professional, so any advice provided in the article should be taken as opinion-based. There are three ways to test the radon levels in your home:

  1. Hire a Professional
  2. Mail-in Radon Test Kit
  3. Radon Gas Detector

Hire a Professional

If you’d feel most comfortable having a professional take care of this process start to finish, hiring a Certified Radon Tester is the way to go. You can find a Certified Radon Professional by starting at the EPA’s Radon website, choosing your state, then following the links from there. Expect to pay around $150 for a Certified Radon Pro to come to your home, perform the test and provide results.

Order a Mail-in Radon Test Kit

You can save a few bucks by ordering a Radon Gas Test Kit for around $15. It typically takes two to four days for the test to complete. Once the test is complete, you’ll mail in the kit and can expect results to be emailed to you within two or three days. Keep in mind that with both methods above, a 3rd party now has additional “data” related to your home. This may bother you, it may not. But it’s worth noting.

Purchase Your Own Radon Gas Detector

There are a few reasons to have a radon gas detector at your disposal:

  1. You’d like to monitor your radon levels over time
  2. You can measure radon levels for your friends and relatives (or perhaps split the cost of the detector)
  3. You’re not comfortable with a 3rd party having information about your home
  4. Labs make human errors

My personal reason was that I decided to build my own radon mitigation system and I wanted to be able to test multiple areas of my home, before and after the install. Whatever the reason, I think you’ll find the cost isn’t that prohibitive. I purchased the Safety Siren Pro Series 3 Radon Detector on Amazon for about $130. There are a couple different products out there, but this one was the lowest price I could find and it returns a reading in 48 hours. It will also continually monitor your short- and long-term radon levels for you.

high radon reading

My radon reading: pCi/L. Yikes!

Setting it up was extremely easy. They recommend placing the detector at least a foot away from any walls, in a spot that doesn’t have any air flow. I personally hung the detector from the ceiling, by its power cord. Whether you’re considering Radon mitigation or not, it’s still a good idea to at least have the facts about your home’s radon levels, especially if you’re in a high-radon area.

UPDATE: Since this post was written, it seems that the radon detector I purchased on Amazon years ago is no longer fulfilled by Amazon. The price has gone up as well. While I have not tested this model, it seems to be very highly rated among buyers:

Tumblr
Pinterest


Just one more thing…we're inviting 5 new DIYers to our Become an Author program. Write articles just like this one and earn a little pocket money at the same time! Learn more »

Exterior and Landscape

Maple Syrup in 5 Minutes From Your Own Trees

Last Updated

I say five minutes because the actual prep time really is only about five minutes.

Of course, the time that the sap takes to drain out of the tree, as well as the time to boil the sap it is quite a bit longer.

But this really does work, and it’s really really easy!

I had no trouble making delicious syrup on my very first day tapping a tree.

The trick is to wait for the right time of year. In the Northeast, that time is late March / early April.

Step 1 – Tap it

tapping maple tree tubing

Grab any kind of bucket or container and set it under the tree.

Now, find any kind of tubing that kind of matches the size of one of your larger drill bits (we’re looking for something around 1 inch in diameter.)

Find a spot on the tree about 4 feet high and drill into it at an upward 45° angle, about 2 inches into the tree. Then, stick your tube firmly into the hole you just drilled and point it so it drips into the bucket below the tree.

Step 2 – Wait!

You’d be surprised to find out that it only takes less than a day for a gallon of sap to drip out of the tree, depending on tree type, season, etc. At first you might think, “what is all this water doing in my bucket?“ Rest assured that this is tree sap, it is supposed to look similar to water.

Step 3 – Boil it

This next step is even easier than the last one! Just grab the largest pot you have, dump your sap in it and get it to a boil under high heat.

Once a good amount of the water has evaporated, go ahead and transfer it to a smaller pan and continue boiling.

Stop boiling whenever you are happy with the taste. For me, it was somewhere around an hour per gallon.

As far as cleaning the pot afterwards…I found that maple syrup cleans up very easily. Walnut sap took a little bit more effort, for some reason.

Step 4 – Store it

Transfer the syrup to a container and pop it in the fridge. They say it should be good for about two months.

Before you get overly excited, you should know that the amount of syrup you get is a lot smaller than you’d expect.

The pros say that you’ll need 40 gallons of sap to make 1 gallon of syrup!

I actually found my syrup to have a good consistency and taste when boiling a gallon down to about a cup (8 ounces). It’s a little on the thin side, but the taste is definitely there!

Step 5 – Getting Serious

If you do want to tap your trees on a regular basis, you might consider a tapping kit. Amazon sells a few maple tapping kits. I have not tried or tested any commercial tapping products, so you’re on your own there!

Tumblr
Pinterest


Just one more thing…we're inviting 5 new DIYers to our Become an Author program. Write articles just like this one and earn a little pocket money at the same time! Learn more »

Quick Tips

Does the cat scratching at the litter box wake you up at night?

Last Updated

This post is a little off-beat. When we think of DIY projects, cats in litter boxes typically don’t come to mind.

But being a successful DIYer starts with a good night’s sleep! And that can’t happen if the sound of your cat scratching against the sides of the litter box wakes you up at night.

You would think a solution would exist for this. I looked all over the place for litter boxes that were made of a material other than plastic.

The closest solution is the “enclosed” litter box that is really designed to be more decorative than soundproof.

Necessity being the mother of invention and all, I decided to try my luck at solving this problem. It turns out that the solution is unbelievably simple and cost-effective…

Flex Seal can help you sleep better at night, literally

The Flex Seal commercials are almost humorous. There’s no way I’m riding in any boat that has a giant hole in it, only to be repaired by Flex Seal!

In my case though, Flex Seal was the first product that came to mind when I wanted to “rubberized” our cat litter box.

Run a cat’s claw against plastic and it’s almost an ear piercing sound. A cat’s claw against a rubber surface, however, is practically unnoticeable.

Sand it Down

A general rule of thumb is that products will stick better to a surface that is scuffed and dull than bright and shiny.

So grab an old or leftover piece of sandpaper and scuff up all areas of the inside of the litter box.

Grab a Paint Brush

Having never used Flex Seal before, I thought I could just dump it in the litter box and kind a swish it around to cover the bottom.

Not the case!

You want to have an old paint brush or some kind of spreader to move the Flex Seal around after you pour it out. Make sure to coat the walls of the litter box as high as possible.

Suffer for One More Night!

Unfortunately, Flex Seal takes a while to dry. Especially if you laid it on there pretty thick. Give it a full 24 hours before dumping any litter onto it.

It’ll all be worth it when you get that beautifully sound sleep the following night!

Tumblr
Pinterest


Just one more thing…we're inviting 5 new DIYers to our Become an Author program. Write articles just like this one and earn a little pocket money at the same time! Learn more »

Exterior and Landscape

Removing Small Stumps without Grinding or Using Your Vehicle

Last Updated

A couple years back, we posted an easy way to remove shrubs or bushes using your vehicle.

While we still stand behind that method, it may not always be feasible or would require too much work to clean up ruts in the grass that the vehicle made.

Beyond that, not everybody has a vehicle capable of pulling a stump.

Removing Shrubs or Stumps with a Winch

Another option to consider is to use a winch to pull your bush, shrub or small stump.

I got a 4-8,000 pound manual winch on Amazon for under $50 and a couple of tow straps as well.

As you can see in the video below, I wrapped one end of the tow strap around an existing stump that I had.

I then wrapped the other strap around the shrub stomp I was trying to remove.

Then, joined the two straps together with my winch in the middle.

It didn’t take too much effort to start cranking the winch and hear movement in the shrub roots.

After about a dozen cranks on the winch, I was able to easily remove the shrub stump by hand.

Tumblr
Pinterest


Just one more thing…we're inviting 5 new DIYers to our Become an Author program. Write articles just like this one and earn a little pocket money at the same time! Learn more »

Quick Tips

Reclaim that end piece of bread

Last Updated

When you think about it, we’ve all wasted a lot of bread in our time!

If you go through a loaf of bread per week, that’s 2 end pieces wasted every 7 days. That’s over 100 pieces per year (enough to make up a few loaves of bread).

Not to mention the extra space used up in your trash bag!

So how do you reclaim that end piece that nobody wants? Take 20 seconds to watch the video below.


Tumblr
Pinterest


Just one more thing…we're inviting 5 new DIYers to our Become an Author program. Write articles just like this one and earn a little pocket money at the same time! Learn more »

Food / Cooking

DIY Meat Jerky Using an Affordable Dehydrator

Last Updated

I’ve been on the jerky kick lately and it has not been good for our finances!

That is, until an acquaintance of mine offered me some venison jerky and I asked him how he made it.

The short answer is to use a food dehydrator, but there’s a little bit more to it…

It turns out that there are tricks to the way you slice the meat, marinate it, pre-cook it and dry it.

I’ll let the video explain the details! The product used in the video is below

Presto 06300 Dehydro Electric Food Dehydrator


Tumblr
Pinterest


Just one more thing…we're inviting 5 new DIYers to our Become an Author program. Write articles just like this one and earn a little pocket money at the same time! Learn more »

Quick Tips

Lawnmower Carburetor Leaking Gas? The Quick Fix.

Last Updated

“Didn’t I just fill the gas tank?”, I would ask myself week after week after cutting the lawn. That is, until I finally realized that there’s a gas leak somewhere!

The reason it took so long to discover the issue is that the gas was leaking so slowly that it was actually evaporating and not leaving any trace.

Yes, gas evaporation is a thing! There have been studies on it.

When trying to find the source of the leak, I started at the gas tank. Then I worked my way down through the fuel line, past the fuel filter and then right behind the air filter box where the carburetor sits.

Yep, My Carburetor is Leaking

Bingo! When I reached my hand behind the air filter box, I could feel that the carburetor was damp with gas.

My first thought was, “Dang! I’m gonna have to replace the carburetor.” But carburetors are over $100, plus whatever time it takes to figure out how to swap it out.

Next thought, rebuilding the carburetor. I’m sure the kits are inexpensive. But it still involves removing the carb, figuring out how to rebuild it, then replacing it.

Then, the most obvious choice hit me while I was sitting there staring at fuel line. An inline shut-off valve!

Inline Shut-off Valves

Not only are shut-off valves inexpensive (about $9 for 5 of them!), but they’re extremely easy to install.

All you have to do is cut out a segment of your existing fuel line (it’s easiest to do this when your gas tank is empty) and replace it with the inline shut-off valve.

fuel shutoff lawnmower

That’s it! You now just have to get in the habit of shutting off your gas line after each use.

Winterization Bonus

As a bonus, this will not only conserve your fuel, but will make winterization one step easier (as you now have a gas shut off valve).

Just before your last use of the season, turn off the gas line while your engine is running and let it starve itself out of gas.

This will prevent any residual gas from gumming up your components, especially your carburetor.

Or, If you’d rather watch the video…

Tumblr
Pinterest


Just one more thing…we're inviting 5 new DIYers to our Become an Author program. Write articles just like this one and earn a little pocket money at the same time! Learn more »

Exterior and Landscape

Cutting down 30 foot high tree branches – without climbing

Last Updated

Believe it or not, there is an easy way to cut down high tree branches (we’re talking 30 feet plus) without training to be an acrobat, buying climbing equipment or paying a professional hundreds of dollars.

For many of us, that high tree branch is obstructing an otherwise beautiful view, adding wear and tear to our roof shingles or is simply dead and unsightly.

Whatever the reason, that tree branch has got to go! So let’s get to work…

What You’ll Need

Direct links to the products on Amazon are included. Total cost is about $35 – $40.  Most folks will already have everything they need, except the pocket chainsaw. In that case, you’ll only need to invest $20.

  1. Pocket Chainsaw
  2. Rope (100ft.)
  3. Gloves
  4. A 1.25 or 2.5 pound weight
I don’t have a 1.25 pound weight. I’m not trying to brag, but I only have 2.5 pound weights.
If you don’t have a plate weight, any object weighing around 1 lb. that you can tie the rope around or through will work.

Time Commitment

This happens a lot quicker than you might think. Once you get the hang of it, you’ll be taking branches down in 5 to 10 minutes.

Of course, cutting up and disposing of the branches will take additional time.

How to Cut High Branches From the Ground

Step 1 – Cut the Rope

Cut your 100 foot length of rope in half to create two 50 foot pieces.

The easiest way to do this is to tie both ends of the rope to an object, then stretch the rope all the way out to find the center point. From there, just cut it with a knife or blade of some kind.

cut the rope

For extra credit, you can use a lighter to burn the end of the rope so it doesn’t fray any further.

prevent rope from fraying

Step 2 – Warm Up Your Shoulder

This is where that very light weight comes in that I mentioned in the beginning.

Tie the rope to the weight and throw it up over the tree branch you are trying to take down. You want to try to get as close to the trunk of the tree as possible.

rope over tree limb

Personally, I found this difficult with anything above 25 feet high. Believe it or not, the weight of the rope itself actually hindered the throw a bit.

For anything above 25 feet, I usually start with kite string and a small rock. Once you throw the kite string over the branch, you can tie the rope to the string and pull the rope over.

With extreme heights, you can try using a slingshot, or bow and arrow if you have that kind of skill (I do not).

Step 3 – Attaching the rope to the pocket chainsaw

Once you have one of your ropes hanging over the tree branch, it’s time to tie one end to your pocket chainsaw.

At this point, you’ll also tie the other rope (that is not hanging from the tree) to the other end of your pocket chainsaw.

Now, continue to pull the rope until the chain is sitting firmly on top of the branch you are cutting.

pocket chainsaw on tree limb

If you’re lucky, the teeth of the chain will be facing down on top of the branch. Otherwise, you’ll have to pull the chain back down a bit, then real it up again trying to make sure the teeth are facing down. This may take a few tries!

Step 4 – Start Sawing!

This is actually the easiest part. It just takes just a little bit of shoulder muscle.

Put on your gloves and start pulling the ropes back and forth at a consistent speed.

Do not exert any downward force on the ropes by pulling hard while you saw. Let the teeth on the chain do the work.

When you hear the branch start to crack, get ready to run!

If the branch did not come down cleanly, chances are that the chain is still hanging from the tree, and you can continue to saw the branch off until the cut is clean.

cut tree branch

Congratulations, you just did something that you may have never thought possible without hiring a pro!

Tumblr
Pinterest


Just one more thing…we're inviting 5 new DIYers to our Become an Author program. Write articles just like this one and earn a little pocket money at the same time! Learn more »