When it comes to buying larger items, retail traditionally wins. It’s difficult to compete with the customers seeing the product first-hand and not having to pay high shipping costs to receive their product.
It’s clear though, that some manufacturers of larger products are trying to find ways improve sales online. High-res images, 360 degree views and customer reviews are helping to make this happen. But shipping costs have always been one of the biggest deterring factors for online shoppers looking to purchase large or heavy items.
However, it seems that many have found a way to offer free shipping and still maintain a competitive price. Below is a list of some products we found that surprised us with their free shipping offer, considering the price was equal to, or less than retail!
Pressure Washers
We found a few Generac pressure washer products that were part of the Amazon Prime 2-day shipping program. In each case, the price was almost identical to that of Home Depot or Lowes.
Once you own a pressure washer, you’ll wonder how you went so long without one! They make easy work of cleaning concrete, stripping paint, washing your siding and quite a bit more.
They also don’t use much gas compared to the time and energy they save you.
The Generac pressure washer listed here currently has a 4.4 star rating on Amazon.
Table Saws
You don’t start to appreciate table saws until you try ripping a board with a circular saw or trimming 1/4″ off a piece of material with a jig saw.
Table saws are much smaller and more portable than they used to be. This makes them perfect candidates for free shipping offers.
We compared a number of table saws on Amazon against big box store prices and found that the prices were identical in almost all cases.
When shopping for a table saw online, just consider the rip capacity. If you want to be able to rip sheet wood, make sure you look for a rip capacity above 24″. If you’re happy ripping sheet material with your circular saw, then you can save a few bucks on a model with a smaller rip capacity.
Ladders
This category might be the most surprising. Not only are ladders on the heavy side (as far as shipping goes), but their dimensions almost put them outside the limits of traditional ground shipping.
Yet, we found online deals that actually beat retails stores by up to 25% and offer free shipping!
The Little Giant is one such product. These multi-position ladders have recently become very popular for their quality and versatility. All the more reason we were surprised to see a price drop on Amazon.
Subscribe & Save on Hardware
We’re not necessarily surprised that certain hardware items offer free shipping. But the ability to subscribe to monthly purchases and save even more money is worth noting.
Amazon’s Subscribe and Save item isn’t just for food. If you’re a builder or hobbyist of almost any kind, a monthly supply of your most-used hardware would eliminate trips to store and save you up to 15% in the process.
As an example, woodworkers that rely on pocket-hold joinery might find that a subscription to pocket holes screws is a great way to ensure you’re never short on fasteners.
And if you find you’re stocked up enough for a while, you can always skip a month in your subscription.
20 Gallon Air Compressor
I’m not talking about those 3-gallon compressors that leave you constantly waiting while they refill with air. 20 to 30 Gallon compressors provide a higher CFM (cubic feet per minute) and still maintain a good degree of portability.
We’ve seen these priced similarly on both Amazon and retailers with online stores, such as Home Depot. Home Depot even offers free shipping on some of their compressors.
Amazon takes it one step further by providing free 2-day shipping if you’re a member of their prime program.
One of the key benefits of air compressors is that the tools are cheap (as they don’t require a motor) and last a long time with very basic maintenance. Drop a couple drops of air tool oil in them every so often and you’re good to go!
Just one more thing…we're inviting 5 new DIYers to our Become an Author program. Write articles just like this one and earn a little pocket money at the same time! Learn more »
Nothing makes me happier than when a friend of mine starts bragging about their new 75″ TV. It gives me the opportunity to use one of my favorite TV-size humbling lines — “oh, you measure in inches?”
That’s right, with projectors we measure in feet! I’ve got a 10.5 ft. screen at home and the corresponding projector cost me a lot less than a 75″ TV would have.
But then a couple years go by and one day you notice that the projector starts “turning off” after a few minutes. A likely symptom of a dying projector lamp.
You hop onto the manufacturer’s website, ready to order a new lamp. Find your exact replacement lamp model and “smack”, the price is $300+ for a new lamp!
The good news is, there are a good number of non-OEM (aftermarket, if you will) lamps out there for a fraction of the price.
The trick is to check on Amazon and find a non-OEM lamp that fits your model projector. Browse the Questions section of the Amazon listing to see if other buyers had good results with your specific projector model.
I personally have a Sony Bravia projector that I’ve been happy with for the past 9 years. In all fairness, the $300 bulb I first purchased lasted about 7 years (over 6000 hours).
Though, I did purchase my current non-OEM lamp almost 2 years ago (almost 2000 hours now) at just $40 and it’s still running strong!
Just one more thing…we're inviting 5 new DIYers to our Become an Author program. Write articles just like this one and earn a little pocket money at the same time! Learn more »
If you have empty-wall syndrome in one of your spaces, consider this low-cost DIY project. You’ll end up with a useful mirror in a position where a side window would normally be placed.
At first glance, what appears to be one solid piece of glass is actually 9 individual window tiles. This project will cost you about $100 in materials.
Because it’s a mirror and not see-through glass, the project becomes quite a bit easier as you aren’t required to create a mortise in each of the mullions to hold the mirrors. Instead, you simply glue the mirrors onto the face of the frame.
Just one more thing…we're inviting 5 new DIYers to our Become an Author program. Write articles just like this one and earn a little pocket money at the same time! Learn more »
I’m not a certified radon mitigation professional. I’m not a professional contractor or licensed electrician. I’m also not a plumber. I want to make it very clear that the methods I used may not be in alignment with the EPA’s recommendations for radon mitigation. This post simply outlines the steps that I took personally to reduce the radon levels in my home.
That being said, I’d use this article more for inspiration, than as a step-by-step, how-to guide to radon mitigation.
You maybe asking yourself, “What does being an electrician or plumber have to do with mitigating radon?” You’ll soon find out that some of the steps require knowledge of basic wiring and drainage (in this case, draining air out of your home through PVC piping).
Measure your existing radon levels
You might already know you’re home radon levels. You may have purchased a mail-in home test kit or are going by your local average radon levels.
In either case, I encourage you to purchase your own radon detector, as you’ll want to measure levels in various areas of your home both before and after you install your mitigation system.
I personally chose the Safety Siren Pro Series3 Radon Gas Detector. I got it on Amazon for about $130. You simply plug it into a wall outlet and it will provide you a reading within 48 hours.
Before you decide where to install your mitigation system, you should spend a couple weeks testing your radon levels in various areas of your home.
During my testing, I found that my highest levels were coming from my sump pump crock. From what I have been reading, this is very common, as radon gas will take the easiest route to escape from the ground and into the air.
My radon reading: 39.1 pCi/L. Yikes!
With that in mind, the remainder of this article will be specific to installing a radon mitigation system over your sump crock.
You maybe asking yourself, “if the majority of radon is coming in through my sump pump crock, why not just cover and seal the crock?” The reason is that if you prevent the escape of Redon from one spot, it will simply trying to find another way to escape into your home.
Other common places where Radon tries to surface is through the expansion joint in your basement slab or even cracks in the basement floor.
Given this, the best course of action is to capture the radon gas as it enters and evacuate it, with a mitigation system, into the outside air.
So, let’s get started!
Finding the Right Sump Cover
If you have a sump basin (a plastic container that lines your sump hole), this process is a little easier. Sump basins typically come with a partial cover, but offer fully sealed covers as a separate purchase.
In my case, a separate sump cover was available, but it had a “not for radon use” warning imprinted on it. I purchased it anyway!
You may ask, why didn’t I go with the $100 radon safe sump cover offered by various manufacturers? The short answer is: because my cover cost $10 and it did the job after I applied a bead of silicone sealant around it.
If you don’t have a sump basin, don’t worry, it just takes a little extra work. I actually have a second sump hole that did not have a sump basin in it.
In this case, I purchased a 24 x 24 sheet of Lexan from my local Home Depot. I then used a jigsaw to cut a circular shape out of the Lexan that fit nicely over the sump hole. And again, once everything is in place you could be sealed with silicone to make it airtight.
The advantage to Lexan is that it’s clear and you are able to see if there is ever water in your sump hole.
Purchasing an Inline Exhaust Fan
The inline exhaust fan is what will actually draw the radon up from your sump hole and push it outdoors.
Since it will be running 24 hours a day, seven days a week, it’s important to consider these two criteria when purchasing your fan:
Wattage vs. Airflow
Sound
Don’t worry too much about the duct size, as long as it’s larger than 3 inches. You can reduce or expand to fit your piping as needed.
The fan that I purchased (the Fantech 100) had the following specs:
130 CFM
20 Watt
Extremely quiet
4″ duct
The fan itself, at about $130, was over half the cost of the project. (EDIT: I see the fan is now about $110 on Amazon.)
The last thing to consider when purchasing a fan is wiring. I could not find a decent fan that plugged into a wall outlet. It’s possible I didn’t look hard enough, but all of the in-line fans I saw were hardwired.
Don’t let this scare you away, even if you don’t have the basic knowledge of wiring. Because we are installing this over a sump pump, it’s very likely that you have an outlet close by.
You can likely hardwire the exhaust fan to the wire that feeds your sump pump outlet.
Connecting the Fan
This part was probably the easiest of the whole project. I simply purchased two rubber / flexible couplings and use them to join the fan with the rest of the system.
I did this in case the fan ever needs replacement. In the event that happens, I’ll just have to unscrew the rubber couplings and replace the fan.
Determine your exit point and fan location
Next, you’ll want to determine the exact point that the PVC piping will exit your home. I chose to drill a 3 1/2 inch hole in my rim joist (in the basement) and send the pipe out there.
You don’t want to drill that hole just yet, in case something goes wrong along the way. But, it’s important to identify where the exit pipe will be, so you can plan your piping.
You’ll also want to consider whether you want the exhaust fan to be inside or outside of the house. It is recommended that the fan be as far away from the radon source as possible so typically, professionals place the fan outside the house. The fan does a better job pulling the radon than pushing it out.
That being said, I personally chose to locate the fan inside my cozy basement, away from the elements (rain, snow, etc) and also improving outdoor aesthetics. I can’t be certain that I would not have achieved an even lower radon level if I placed the fan outside, but I’m still happy with the results.
Prepare your sump cover
In this step, we’ll need to drill three holes into the sump cover, as listed below. All told, I believe this ran about $35.
3 5/8″ hole saw – for the 3″ radon mitigation pipe
1 5/8″ hole saw – for the 1 1/2″ sump water discharge pipe (if you have an old hole saw from a doorknob kit, that’s perfect)
About a 1″ drill bit – for the sump pump wires (a wood boring bit will work fine)
Hole saw arbor bit
Before you drill the holes, make sure you dry fit all the pipes together to ensure you locate the holes in the proper place on the cover.
Prepare your sump pump
We’ll need to do a couple things to our existing sump pump before we can apply the sump cover and seal it in place.
The cut and splice. I chose to make a cut in my sump pump power cord(s), run them through a small piece of conduit, then splice them together again inside a conduit box.
My thinking is that this would make it a little easier to seal the hole where the sump power wires exit the cover.This was the only option with small conduit, as the actual plug at the end of wire doesn’t fit through 3/4″ conduit.So, why didn’t I just go with larger conduit? Since radon will also escape up into this conduit, I wanted to be able to seal around the wires, so a smaller size conduit made more sense.
The pipe union. We’ll do kinda the same thing with the discharge pipe that comes out of the sump pump. We’ll want to cut it and put a union in place to make it easier to service the pump if needed.
Seal the Cover
This is the easy part, but also the semi-permanent part. I used silicone to seal the cover over the sump hole. Anyone who has sealed with silicone before knows that it’s not permanent, but it’s a pain in the neck to remove the silicone bead that you created.
So the lesson here is to make sure that you have a high-quality some pump, that is positioned well in the hole, before you seal the cover on. Also ensure that all your electrical is in good working order before sealing the deal.
Once your electrical is done, pop the cover over the hole and pipes, then put a bead of silicone around the perimeter of the cover and also around the pipes that are coming out of the cover.
Outside piping
I choose to connect the PVC pipe coming out of the basement to a vinyl gutter than runs vertically along a piece of trim on the corner of my house. It is technically supposed to exit above the roof line, but I couldn’t justify the extra effort to do that.
I also know that the fan performance and rate with which the radon can be mitigated will be reduced by turning my exit pipe 45 degrees (as shown in the photo). But, I felt it was more important to keep animals and water out of the system (especially the fan).
Try it out
Get a final radon reading before you seal the sump cover.
Then, after you seal the cover, turn on your in-line fan and put the system to work!
Reset your radon detector, then wait 48 hours and check your reading again.
If all goes well, you’ll see a drastic reduction in radon. Otherwise, check that all your silicone seals are complete and that all pipe joints are snug and glued properly.
Since this post was written, it seems that the radon detector I purchased on Amazon years ago is no longer fulfilled by Amazon. The price has gone up as well.
While I have not tested this model, it seems to be very highly rated among buyers:
Just one more thing…we're inviting 5 new DIYers to our Become an Author program. Write articles just like this one and earn a little pocket money at the same time! Learn more »
I’m one of those guys that will hold onto an appliance until it’s last breath. If leaks water, put a bucket under it. If the motor is loud, wear some earmuffs. So when my refrigerator freezer started to develop some frost build-up, the last thing on my mind was “it’s time to buy a new freezer.”
Why the freezer builds up frost
After researching the problem a bit, I came to realize that most ice and frost build-up issues are due to warm air getting into the freezer, combining with the cool air and creating frost.
The most common way that warm air gets into a freezer is through a bad door seal or gasket.
How to prevent frost build up in the freezer
You can buy a new freezer door gasket, but you’ll find that the original manufacturer replacement part costs you nearly $100. Though, generic options are available in the $30 to $40 range.
There’s an even easier fix that requires both less time and money. It’s called Silicone Gasket Maker.
You can get it on Amazon for about $6 with free shipping, if you subscribe to Amazon Prime. Or, just make it part of your next Amazon order if you don’t have Prime. The 3.35 ounce tube is about what you’ll need.
The great thing about this stuff is that it maintains it’s seal down to -65°F, so the cold freezer air won’t have any effect on it. I chose the black color because it matches my existing freezer gasket.
Fill a cooler with ice and empty the contents of your freezer into the cooler.
Shut off your freezer or entire fridge, if necessary.
Leaving the existing freezer gasket intact, examine the gasket to determine where the major gaps are between the freezer and the gasket itself (where outside air might be entering).
Apply an 1/8″ bead of silicone gasket maker at those points.
Wait about a half-hour, then smooth the silicone down with your finger just to eliminate any major “high” spots.
After a full hour has passed, go ahead and shut the freezer door so the silicone comes in full contact with the freezer.
Check for any remaining gaps where air might enter. Repeat the process again until you’ve accounted for all gaps.
After the final silicone application, close your freezer door tight. The new gasket you just made will still be malleable enough to form a nice tight seal against the freezer surface.
After a day or so, check your freezer to see if there is any frost build-up. If there is, at least you’ve eliminated one possible problem, affordably.
The next step is to make sure that your freezer is venting properly. Make sure that the front or rear vents on the bottom of your freezer are completely unobstructed.
If you have an ice maker in your freezer, check out the flap where the ice enters your freezer. If it is getting stuck open, it can allow air that is relatively warm to enter the freezer.
Just one more thing…we're inviting 5 new DIYers to our Become an Author program. Write articles just like this one and earn a little pocket money at the same time! Learn more »
Before you get too excited and start shopping for more shoes to fill this amazing 10-minute shoe rack, you should be aware of the prerequisites to this project…
Prerequisites
That you have a bookshelf you no longer use or can obtain one at a garage sale.
That you are more interested in shoes than old books that nobody reads.
That you have 10 minutes of time.
That you know how to turn something 90 degrees.
Step 1 – Find an Old Bookshelf
Take a good hard look at the bookshelf sitting in your home office or den. Ask yourself, do I ever read those books? Don’t books stack on the ground better than shoes do?
If you don’t have an old bookshelf, check out Craigslist or do a couple garage sale drive-bys to see if you get lucky.
The number of shelves and dividers is key. The more the bookshelf is divided, the better it will look as a shoe rack.
Step 2 – Consider removing the back, if it has one
You don’t want your shoes to look all dark and gloomy! By removing the back of the bookshelf and positioning it a couple inches from your closet wall, you will allow light to get behind your shoes.
Step 3 – Carry the bookshelf to your closet
There are posts all over the Internet about how to carry things and walk on two feet at the same time. So, we won’t repeat that information here.
Step 4 – Make it a shoe rack
Decide if you want to turn it 90° to fill more wall space and/or add decorative hooks, allowing you to put more than one pair of shoes in the divided spaces.
If you’re really looking to spice things up, drop a Page-A-Day Shoe Calendar in one of the spaces!
Just one more thing…we're inviting 5 new DIYers to our Become an Author program. Write articles just like this one and earn a little pocket money at the same time! Learn more »
Furniture-style bathroom vanities look incredible. Unfortunately, they’re also incredibly expensive.
We recently remodeled our bathroom and quickly chewed up our budget on tile, shower trim and faucet. With almost nothing left for the bathroom vanity, we had to get creative.
My aunt gave us some old furniture a while back, including two traditional-style night stands. They were a bit small to work as a vanity, but cut the legs off one and stack it on the other, and you’ve got something!
But, there’s a problem. The top two drawers compete for space with the drop-in sink and drain. We were on a mission though, a mission of frugality. It was time to break out the jigsaw and start modifying those drawers!
Here’s what we came up with.
For the top drawer, our first inclination was to make it a false drawer. Remove the drawer front and screw it to the vanity.
That presented an accessibility problem though. We’d have a difficult time if we ever needed to access the plumbing behind the top drawer. So, we made some modifications and turned it into the perfect place for toothpaste, hair ties or anything small and flat.
The second drawer didn’t need as much work. The sink drain would have to pass down the middle of it, so we decided to divide the drawer into 3 parts – left, middle (for drain) and right.
I created dividers out of some woods scraps and pocket hole joined them to the face and rear of the drawer.
Just one more thing…we're inviting 5 new DIYers to our Become an Author program. Write articles just like this one and earn a little pocket money at the same time! Learn more »
Last year we had to move some of our baseboard radiators around as we moved some interior walls in our home.
At the time, we didn’t consider the 1 1/4″ hole that would be left behind where the water supply pipe used to be. It’s pretty unsightly, as you can imagine.
I’ve used two methods for creating a plug to fill this hole, and recently discovered a third method that probably takes the cake.
Regardless of the method you choose, the first step is to find a plank of matching flooring to create your plug from. If you don’t have any scrap or extra flooring, head over to your local lumber supply to purchase the smallest possible and closest matching board.
The thickness of the board doesn’t matter too much as the plug you create only has to be flush with the visible floor (the part you walk on). The underside of the plug can protrude down below the floor a bit.
After you create the plug, it may make sense to stain it to match your flooring before you pound it into the hole.
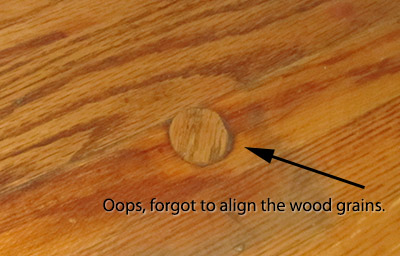
As final note, before we get into the cutting methods, make sure you align your plug properly with the direction of your floor’s wood grain before driving it into the hole. Otherwise, you end up with something like this:
Method #1 – The Jigsaw
If you’re using a jigsaw to cut the circle, you’ll first want to draw the circle on the board so you have a guide to follow with the saw. Use a small section of the pipe that you removed to create the circle.
Whatever you use to make the circle, you’ll want to ensure that the plug is just a touch larger than the hole.
Then, make the cut. Test out your plug by trying to tap it into the hole lightly with a rubber mallet. If it doesn’t fit, shave off a millimeter from the circumfence of the plug with a mouse sander, then try again.
Method #2 – The Hole Saw
The hole saw method works great if you happen to have a hole saw that is about 1/8 inch larger then the plug that needs to be created.
Since a hole saw is designed for making holes in wood, rather than creating plugs, you need to make sure that the hole saw inside diameter is equal to or just a slight bit larger than the plug that you need to create.
Use the hole saw to drill into your scrap board, then remove the wood (plug) from the hole saw and sand it down a bit if needed.
Method #3 (recommended) – The Plug Cutter
A plug cutter is very similar to a hole saw, with the exception that the dimension listed will be the diameter of the plug, instead of the hole.
Similar to a hole saw, you would drill into a matching piece of wood. But then use a screwdriver or other flat edge tool to pry the plug out of the wood.
You might find that a plug cutter set actually makes more sense to purchase, as you may find other uses for wood plugs in your other projects.
This is more easily explained with a video. This one is my personal favorite because it’s only a minute long:
The video demonstrates using a saw to remove the top portion of the plug. Since you’ll be doing this on a finished floor, I’d recommend avoiding the saw and simply using a rubber mallet to drive the plug in until it’s flush.
Just one more thing…we're inviting 5 new DIYers to our Become an Author program. Write articles just like this one and earn a little pocket money at the same time! Learn more »
Spring is here, the grass is growing and it’s time to “spring-ize” your lawnmower.
You did everything right last winter – mixed in some fuel stabilizer and stored your battery safely indoors. But, your battery got bored to death over those long months!
You drop the battery in your lawnmower, tighten up those terminal bolts and turn the key. The only sound you hear is that dreaded “Click click click”.
Your battery is toast. Or, so it would appear. It’s very possible that your battery is alive and well, but hanging on by a thread with a very low charge.
Before you head out to drop $70-$80 on a new battery, consider a lower investment that will pay off in the long term.
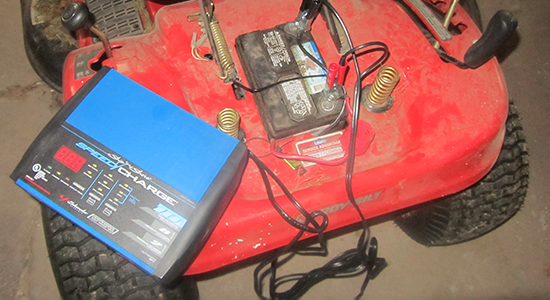
That investment is a 12-volt battery charger. For under $50, there’s a chance you could restore your battery to like new condition. In the worst case scenario, you have a battery that still won’t take a charge, but a tool that you can use for years to come to charge your car, boat or lawnmower batteries.
I purchased the Schumacher SSC-1000A Battery Charger from Amazon about 6 months ago. Since then, I’ve successfully brought my lawnmower back to life after a long winter and charged my car battery after it drained from leaving the headlights on overnight.
The lawnmower batter was in worse shape after sitting for the entire winter, so it took about 6 to 8 hours to slow charge back to 100%. The slow charge feature is also handy if you just want to maintain your battery over the winter. Basically, you leave the battery plugged into the charger all winter and it will stop charging automatically whenever the battery reaches full charge.
The car battery only took about 2 hours (on “fast charge” mode) before I was able to start the engine. That certainly beats calling AAA!
The only thing I thought was a little funny about this charger is that it has a somewhat loud fan that runs whenever the unit plugged in. It’s certainly not a deal-breaker as I don’t sit there and watch the battery charge. Just thought I’d mention it in case anyone decides they want to charge their battery inside a library 😉
Anyway, hope this helps and saves you a few bucks next time your battery doesn’t survive the winter.
Just one more thing…we're inviting 5 new DIYers to our Become an Author program. Write articles just like this one and earn a little pocket money at the same time! Learn more »
Relationships can be complex, some are simple and are just meant to be.
Couples like to travel together, help each other around the house and cook
romantic meals – we all know at least one couple which are inseparable, and
it’s no different for this unexpected “match made in heaven”.
That’s right, an iPad and Velcro. One couple that are quite literally
attached, and have many uses, more than you might think. Find out more in
the infographic below, created by MPD Hook and Loop, and see how this relationship began…
Just one more thing…we're inviting 5 new DIYers to our Become an Author program. Write articles just like this one and earn a little pocket money at the same time! Learn more »


 I choose to connect the PVC pipe coming out of the basement to a vinyl gutter than runs vertically along a piece of trim on the corner of my house. It is technically supposed to exit above the roof line, but I couldn’t justify the extra effort to do that.