We go camping about once a year. It’s always a toss-up whether or not we decide to bring our own firewood, or pay $10 per tiny bundle at the “camp store”.
In the past, we usually decide to bring our own, but it either makes a mess in the car or doesn’t stack well in a container.
This year I decided to spend 5 extra minutes to chainsaw the logs down to size before splitting them(so they fit vertically in our plastic bins). It worked beautifully.
Just one more thing…we're inviting 5 new DIYers to our Become an Author program. Write articles just like this one and earn a little pocket money at the same time! Learn more »
Rub wood screws on a slightly wet bar of soap and they’ll turn more easily in tight holes.
Space your recessed lights by dividing the height of the ceiling by 2. For example, with an 8 foot ceiling, space recessed lights 4 feet apart.
Finishing nailing tip: The fastener (nail) should be twice as long as the piece you are nailing is thick. For example, if joining two 3/4″ boards, the fastener should be at least 1 1/2″ long.
When you get a new drywall taping knife, file down the corners so they don’t tear the paper tape.
Make sure all your water supply pipes are properly supported. Here’s a pipe support failure story that’ll convince you to check your supply pipes.
When painting stripes, choose an orientation based on your room. Horizontal stripes make it appear more spacious; vertical stripes make the ceiling appear higher.
Punch a couple small holes into the rim of a paint can to help the paint drain back into the can.
Leave valves partially open when soldering (sweat fitting). Otherwise, the trapped air expands and can damage sealing components.
A “textured” hammer head will reduce slip and grab the nail better. Don’t use one on finished or visible pieces though.
Secure copper water lines at every connection (soldered or otherwise). This will reduce the possibility of leaks.
Just one more thing…we're inviting 5 new DIYers to our Become an Author program. Write articles just like this one and earn a little pocket money at the same time! Learn more »
If you’ve already followed the Flower Box Part I article, you have all of your flower box and trim pieces cut to the appropriate width and length and are ready to begin assembly.
It’s usually preferable to make all of your cuts first, as it allows you to get into a rhythm not only on the cutting but on the assembly as well.
Step 1 – Countersinks & Pilot Holes
If you only have one drill, it’s typically easier to drill all your countersinks and pilot holes in one step, then insert your fasteners (screws) in another step.
If you have a counter bit, great! Tighten it up in your drill. If not, you’ll have to do this in two steps, one with your counter sink and the other with your pilot bit.
Drill a total of 13 counterbit holes in each of your 30 1/4″ x 10″ front/back pieces that we cut in part I.
Drill a total of 3 counterbit holes in each of your 11 1/2″ x 10″ side pieces that we cut in part I.
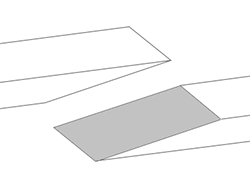
See the diagram below.
The side of the board that you drill the counterbit holes in will be the visible side (the screws will be covered up with trim). So make sure you choose the side that is most aesthetically pleasing for each board.
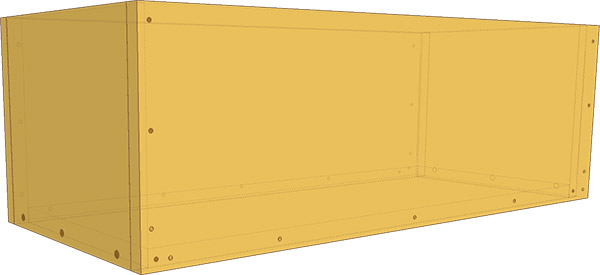
Step 2 – Assemble the box (glue & screw)
Now that you have everything cut and predrilled, simply assemble all three boxes with your 1 1/2″ screws!
The best way to do this is to piece together and glue all sides of the box. Clamp the box in place with bar clamps and start screwing it together.
Step 3 – Assemble the face frames (trim)
The technique I recommend to assemble the face frames is called pocket hole joinery. This technique provides adequate strength for smaller projects while hiding the fasteners “behind” the visible face of the wood. I provide more detail here on pocket hole joinery.
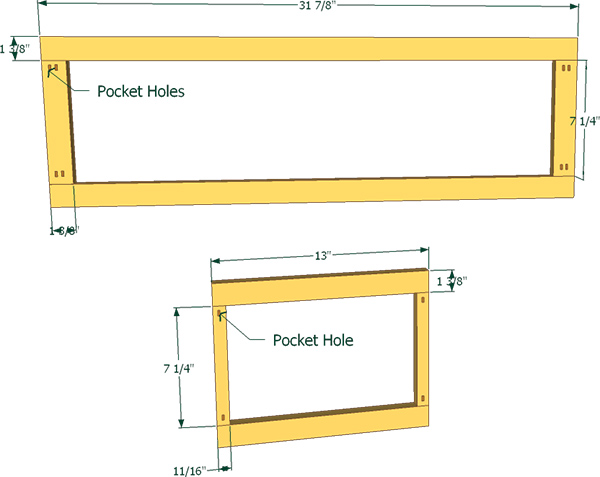
Now that you have all of your trim cut, this step is relatively easy. See the diagram below for pocket hole placement and trim assembly.
Use your pocket hole jig to create 4 pocket holes (2 on each edge) in each of your 7 1/4″ x 1 3/8″ trim pieces.
Then create 2 pocket holes (one on each edge) in each of your 7 1/4″ x 11/16″ trim pieces.
Clamp the trim frames together as shown below with your bar clamps.
Insert your pocket 1 1/4″ pocket hole screws and drive them in with your cordless drill.
Important: Cedar is a soft wood. It’s easy for your pocket hole screws to blow out through the face of your trim. Make sure your power drill is set on one of the lower torque settings. This is also the reason I chose 1 1/4″pocket screws over 1 1/2″ ones.
Step 4 – Attach the trim to the box
There are a number of ways to attach trim to a box. Cabinet makers often prefer to use biscuit joiner, which involves creating a few small football-shaped “grooves” in the back of the trim and the box itself. Then, gluing a biscuit into both grooves.
While this technique is clean and precise, it requires the use of a biscuit joiner, which is not part of most people’s toolset.
The easier approach is to simply glue the frame on the box, then fasten it with finish nails. The finish nail holes will hardly be visible once the project is complete. Especially if you spend a few extra minutes filling the holes with wood putty before you stain the box.
Step 5 – Assemble the top trim (cap)
The next step is to assemble the top trim using the same pocket hole method as with the side trim.
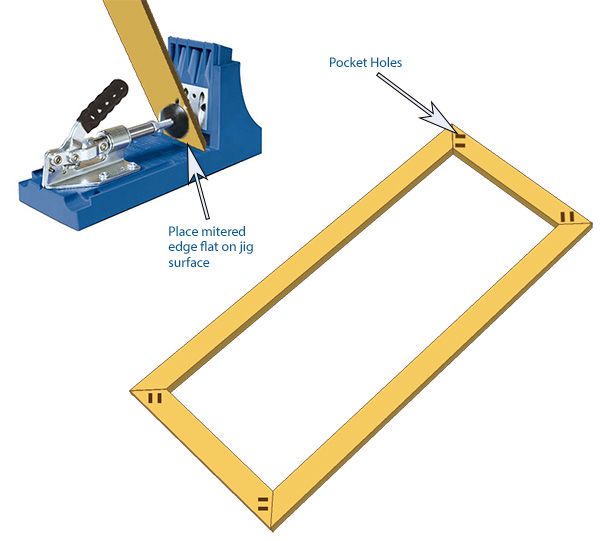
The difference being that the edges are mitered. This presents two minor challenges:
You have to be a little more precise with the placement of your pocket holes.
It’s more difficult to bar clamp the pieces together, as the mitered edges will tend to “slide” apart.
The first one is easily solved by simply placing the mitered edge flat on your pocket hole jig when drilling the holes. See the image below:
The clamping problem is solved with the use of clamping squares (as mentioned in the Tools section of part one).
By clamping a square at each corner as you insert the pocket hole screws, it’s easier to ensure that the two mitered corners stay together while fastening.
Step 6 – Attach the top trim
We’ll use the same method that we used to attach the side trim. That is:
Glue
Clamp
Finish nail
Step 7 – Stain the finished box
For your stain choice, you’ll want a penetrating oil based stain. It will peel less over time. Penetrating stains get deep into the wood instead of resting on the surface.
That being said, your method of application can play a factor in how deep the stain penetrates.
Spraying stain may be easy, but it doesn’t really allow the stain to seep deep in the wood. A brush is typically the best way to apply penetrating stain.
Step 8 – Enjoy!
Give your new flower boxes a few hours to dry after staining, then load them up with potting soil and start planting!
P.S. it is up to you whether or not you choose to put gravel at the bottom of your flower boxes. Some say that it overcrowds the plants, while others say that the drainage is necessary.
The good news is that you now have three boxes to experiment with!
Just one more thing…we're inviting 5 new DIYers to our Become an Author program. Write articles just like this one and earn a little pocket money at the same time! Learn more »
A contemporary flower box borrows it’s design from modern kitchen cabinet styles. Some have posts, columns or corbels, while others have raised panels or intricate moulding.
To a professional woodworker, these accents and techniques are just part of their skill set. But, we’re not professional woodworkers!
I’d like to approach this mini-project from the prospective of someone who doesn’t have the full arsenal of woodworking tools. Though, I would like to introduce you to a very affordable, simple and strong joinery technique called pocket hole joinery (if you aren’t already familiar). Pocket hole joining is a technique where the fastener itself remains hidden, but creates a strong butt joint. Butt joints, typically considered a weak and silly joint used only by the lowest of DIY amateurs, are given new life with pocket holes. More to come on that later.
Let’s get started.
Tools
Power Drill
Miter Saw or Circular Saw
Table Saw or Circular Saw with a Rip Fence (Manufactured or DIY)
Approximate Cost:$30 – $50 per flower box (depending on box size).
(3) 12″ x 16′ cedar boards (12 inch x 16 foot)
Length and amount depends on the size and number of boxes you want to build. I chose flower box sizes that made good use of 8ft. cedar boards with little waste. More on that later…
To produce three (3) flower boxes, we’ll need three (3) 12″ cedar boards.
1 1/4″ finish nails – gauge to match your nail gun .
(optional, but highly recommended)
Quart of exterior wood stain.
Foam brush or rag to apply the stain.
Step 1 – Making your cuts
I designed the flower boxes around 8ft. x 12″ cedar boards. My local 84 Lumber sells 16 ft. x 12in. cedar boards for $60. They were willing to cut them down to 8ft. at no charge because it wasn’t that busy when I bought them (I believe they normally charge $1 or $2).
Cutting them down to 8ft. makes them not only easier to load into your vehicle, but easier to work with in the workshop. It also makes the “cut math” a little easier.
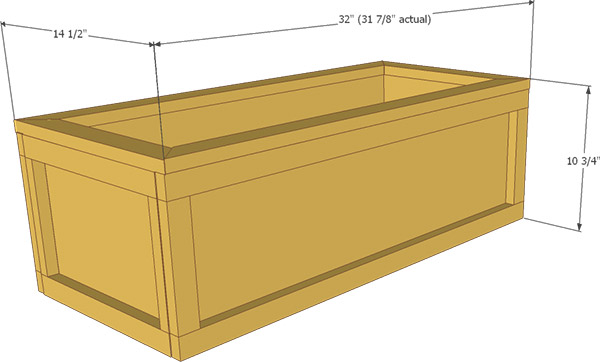
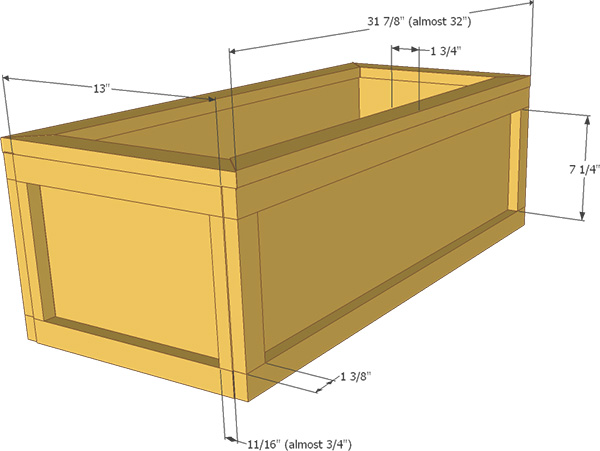
Eight foot boards means three equal width flower boxes at 32″ (including trim).
The 12″ board width (11.5″ actual) allows us to create 10″ tall boxes while reserving extra material for the trim.
The Box Cuts
Cut List
(6) 30 1/4″ x 10″ pieces (for Front & Back)
(6) 11 1/2″ x 10″ pieces (for Sides)
(3) 29″ x 11 1/2″ pieces (for Bottoms)
Cut Process
If you have 16 foot boards (you didn’t get them cut down to 8 foot boards), cut them in half (down to 8 foot). It’ll make the job easier.
With your table saw or circular saw, rip a 10″ wide cut from four (4) of your 12″ Cedar boards. This will provide the material for the box itself (with leftover for the trim). Leave your last two (2) cedar boards at their full 11 1/2″ widths.
Box Front & Back: With each of your two (2) 8 foot cedar boards, make 30 1/4″ cross cuts to produce a total of 6 pieces.
Box Sides: With one (1) of your 8 foot cedar boards, make 11 1/2″ cross cuts to produce a total of 6 pieces.
Box Bottoms: This is perhaps the easiest one of all. Simply take one of your 8 foot cedar boards and make three cross cuts at 29″. You’ll now have three equal 29″ x 11 1/2″ pieces for your box bottoms.
The Trim Cuts
Let’s start with a diagram to help guide you:
Cut List
(12) 31 7/8″ x 1 3/8″ Trim Pieces (for Front & Back rails)
(12) 13″ x 1 3/8″ Trim Pieces (for Side rails)
(12) 7 1/4″ x 1 3/8″ Trim Pieces (for Front & Back stiles)
(12) 7 1/4″ x 3/4″ (11/16″ actual) Trim Pieces (for Side stiles)
(6) 31 7/8″ x 1 3/4″ Trim Pieces (for Top)
(6) 14 1/2″ x 1 3/4″ Trim PIeces (for Top)
Cut Process
After you make the cuts for the box itself, you’ll have a 8 x 1 3/8″ piece of trim left over from each of the 3 boards. This will leave you with 24 feet of 1 3/8″ trim (taking away 1/8″ for the width of your saw blade). With one of the remaining 8 foot boards, you’ll have a total of 88 feet of trim. Seems like a lot, but you’ll need it!
It’s also likely you’ll need to tap into your 6th remaining 8 foot board for a couple feet of trim if you run out of material. I know I did.
With your remaining 8 foot board, rip 4 strips at 1 3/8″ each. This will provide an additional 32 feet of 1 3/8″ trim.
Now, rip 3 strips at 1 3/4″ each. This will be used for the top trim.
Front & Back Trim Rails (Horizontal): Make 12 cross cuts on the 1 3/8″ trim, each at 31 7/8″. This will allow us to get 3 cuts from each 8 foot piece.
Side Trim Rails (Horizontal): Now, make 12 cross cuts on the 1 3/8″ trim, each at 13″.
All Trim Stiles (Vertical): Make 18 cross cuts on the 1 3/8″ trim, each at 7 1/4″.
The Side Trim Stiles: Now, take 6 of those 7 1/4″ pieces you just cut, and rip them right in half on your table saw – creating a total of 12 7 1/4″ pieces that are almost 3/4″ wide (11/16″).This step is what makes this project easy. We’re skipping out on ripping a miter angle down all of the trim stiles, and instead butt joining the vertical trim together at the corners.
The Top Trim: Finally, with the 1 3/4″ trim that you ripped earlier, make six (6) cuts at 31 7/8″ and six (6) cuts at 14 1/2″. If you run out of wood, just fall back on that 4″ x 8′ cedar board you purchased separately.
Now, you need to miter the top trim cuts. Set your miter saw at 45° and cut a miter into each top trim board. Make sure you cut in the correct direction, so as to create a square from two of the 14 1/2″ pieces and two of the 31 7/8″ pieces.
Now that you have all your tools, materials and cuts done, let’s move on to:
Just one more thing…we're inviting 5 new DIYers to our Become an Author program. Write articles just like this one and earn a little pocket money at the same time! Learn more »
It’s family movie night – that rare occasion where your spouse and kids are all available to relax on the couch for a couple hours. About minutes into the movie, after you’ve barehanded 5 or 10 massive amounts of popcorn into your face, you hear a familiar sound. It’s the sound of someone filling up the bathtub as water runs through your home plumbing at full capacity.
Except, everyone’s on the couch. Who could be running water? You start wandering around the house, checking all the faucets. You start to head down to your basement, where the sound changes from water flowing through pipes to water coming out of a fire hose. You have a pipe leak. A big one!
Okay, so that’s not exactly how it happened to me, but I like the drama. I was working quietly in my basement at the time (about a week ago). Because I was so close to the source of the leak, I identified the problem within about 30 seconds. But, what if I wasn’t in the basement, or wasn’t even home!
Why water supply pipes leak
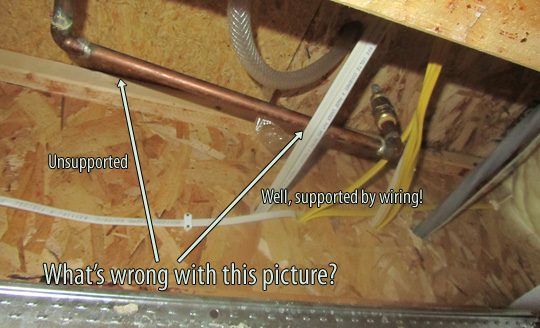
I’m sure there are a number of reasons that pipes leak, but I’m only going to talk about one today, the unsupported pipe (the reason my pex tubing popped off of my barbed fitting).
Gravity imposes stress on any joint. Imagine holding your arms out to your sides for more than 5 minutes. If you don’t get bored first, your shoulder joint will start to ache.
This applies equally to any plumbing joint, especially one that is close to a water source that is stopped and started frequently.
An unsupported pipe joint sags, even if just a little bit. That sagging effect can weaken the joint over time, depending how much the pipe moves when water starts or stops flowing through it.
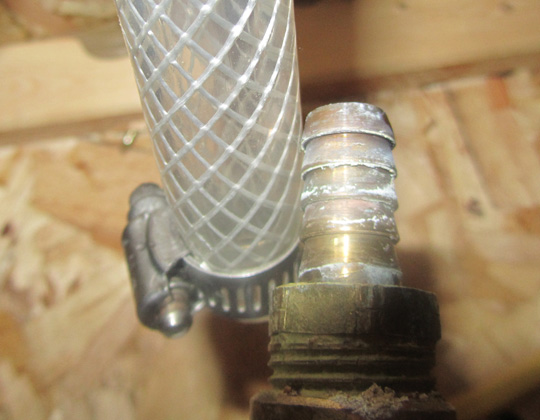
In my example above you’ll notice that I hastily installed my dishwasher supply line, leaving it completely unsupported. In fact, I left it to rest on my wiring! Granted it was about midnight when I was working on this, so I likely had enough after it was functional. But I should have returned to it.
Here’s the result of my laziness, 3 years later:
Yep, after a few years of water stopping and starting, the unsupported connection grew weaker and weaker until it finally gave up.
How to support plumbing pipes
There is no easier DIY task than supporting plumbing pipes. Myriad products exist to support water supply and drain lines. The most common arguably are the pipe hanger and the pipe strap.
Pipe hangers are handy for drain pipes as they’re larger and often don’t suit themselves to being strapped to a floor joist, where a hanger would allow them to be suspended from the side of a joist.
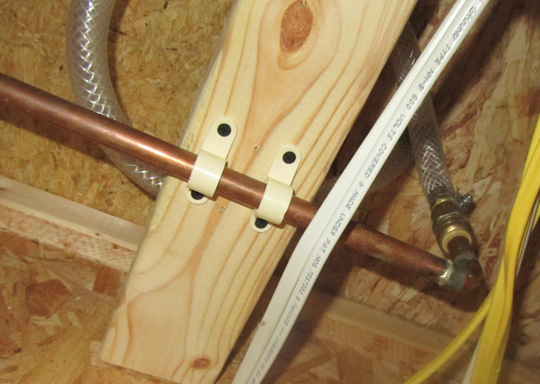
I recently stumbled on my favored solution to date, the EZGlide Tube Clamp. They were about $1.50 for a bag of 5 at Home Depot. Easily worth the additional 20 cents over the tube straps.
The tube clamps “clip” onto the pipe to make it easier to attach them to a surface. Once you clip them onto a pipe, they’ll slide along the pipe, but won’t fall off.
In my case, I ran a 2×4 between within the floor joist bay, as it was the only way to properly support the pipe.
It really couldn’t be easier. So, I urge you to spend 5 minutes in your basement or crawl space to see if you can identify any poorly supported pipes. Look at the connections themselves and make sure the pipe is supported somewhat close the the connection.
I spent 3 hours cleaning up my basement today, due to the water leak. Something that could have been prevented with 5 extra minutes spent supporting my pipe.
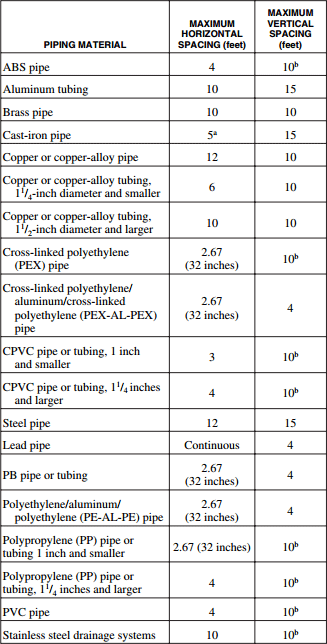
Where to support the pipes
Each town / state may have it’s own building codes related to how pipes should be supported.
This table was pulled from Virginia’s plumbing code, but I have to assume other codes are similar.
Just one more thing…we're inviting 5 new DIYers to our Become an Author program. Write articles just like this one and earn a little pocket money at the same time! Learn more »
Use water-based primer on new drywall, oil-based primer for surfaces that have water stains or smoke damage.
Use a synthetic-bristle brush for latex paint and a natural-bristle for oil-based paints.
Dip your brush 1/3rd of the bristle length for water-based paint, 1/4th of the bristle length for oil-based.
Woodworking
Help wood glide across your table saw by waxing the table. Or go with GlideCote, a wax alternative.
Hook a shop-vac to your power sander to save sandpaper. This prevents your resanding of the wood dust.
We at AmateurDIY love pocket hole joinery. We just couldn’t pass up this chance to pass along a quick tip to fix wood splits.
When sawing wood, use a marking knife to scribe a shallow cut for the saw to follow. The marking knife edge cuts through wood fibers more accurately than a saw blade.
To bend wood, make a series of cuts, close together, on the side of the wood that won’t be visible.
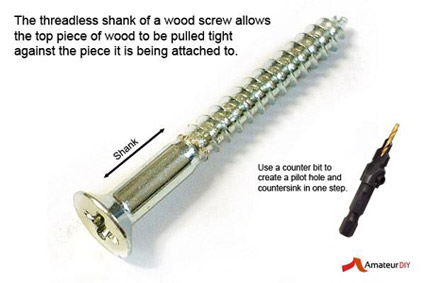
Prevent wood splits & save time with a counterbit. Combine this technique with the wood screws for a clean & tight joint.
Sharpen new cutting tools before you use them. Many edges come with corrosion-resistant coatings that should be removed.
Plumbing
Improve water pressure by soaking your shower head spray plate in descaling solution (often used on coffee makers).
Before sweating, remove all water from the lines with a shop-vac or hold a piece of bread in the pipe to absorb the water.
When winterizing, use an air compressor to blow excess water from your lines.
General
If you need to replace roof shingles, do it in cooler weather when the old shingles will be easier to remove.
Soap and baking soda is a safer alternative for removing mold than bleach.
Spray vinegar regularly on an area that is mold-prone to reduce the changes that mold will strike again.
Spacers aren’t just for tile. Keep them handy after a tile job. For example, they can be used to maintain the alignment of glass block installations as well.
Here’s a fun one. If you’re lacking a level, you can use a marble in it’s place. If the marble stays in place, you’re pretty close to level.
Table saw image by Patrick Fitzgerald (originally posted to Flickr as spinning wheel) [CC BY 2.0 (http://creativecommons.org/licenses/by/2.0)], via Wikimedia Commons
Just one more thing…we're inviting 5 new DIYers to our Become an Author program. Write articles just like this one and earn a little pocket money at the same time! Learn more »
After reviewing a number of different smoke alarm placement instructions, it seems that it’s okay to put one in the kitchen, if you have a larger kitchen. Essentially, the smoke alarm needs to be at least 10 feet away from the stove.
When a toilet continues to “sweat” after it’s been used, it could be an improperly adjusted tank valve or a leak.
A great tip for beginner woodworkers that are getting into routers. Put the router fence to the router’s left, as the router naturally wants to sneak to the left.
A simple rule to avoid clutter in any space, including garage, workshop or pantry: Make sure you can see everything. Stack items as necessary, make sure nothing is hidden.
Have an upcoming tile job? After mixing grout for tile, allow the grout to stand for 15 minutes before using it. It allows any dry areas that didn’t get mixed properly to absorb as much water as possible before use.
If you’re doing tile, there’s a good chance you’ll be replacing a toilet. After removing the toilet, stuff a rag into the opening to block sewer gasses until your new toilet is in place.
Most people associate ripping wood with a table saw. But, there’s a safer tool for the job.
The bandsaw can tackle smaller jobs without the risk of kickback from the blade. They’re also typically more affordable and portable than table saws.
Trouble removing disposable gloves. Or, maybe you’d prefer they be a little less “disposable”?
Add a little talcum powder to them before you put them on. You’ll find they come off a little easier and will have less tendency to break when removing them.
If your shower head is spraying unevenly, it could be clogged with mineral deposits. Try cleaning the holes with a coarse needle.
Want a quick way to remove rust that’s safe for many surfaces? Try 320-grit sandpaper. Finish with a finer grit to remove any scratches if necessary.
Just one more thing…we're inviting 5 new DIYers to our Become an Author program. Write articles just like this one and earn a little pocket money at the same time! Learn more »
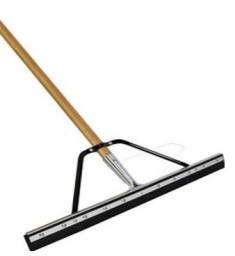
About $15 at Home Depot or Lowes, or you can snag one online. They look like this:
Buy your sealer
It’s relatively cheap at $15 – $25 per 5 gallon bucket
For previously sealed driveways, you’ll get 400 square feet of coverage per 5 gallon bucket
For new driveways, expect to get about 200 square feet per 5 gallon bucket
Get a mixing paddle for your drill
Mix it up. All the good thick sealant will settle to the bottom of the bucket, so it needs a good stir.
Avoid stirring the sealer by hand, you’ll tire yourself out before you start!
You might think that the paddle would cause the sealer to splash all over the place. You’d be surprised, just keep the paddle near the bottom of the bucket while it’s spinning.
Put up a barricade at the end of your driveway
Cement blocks with a board across them
Thick rope or ribbon between two trees
Road / construction cones, or
Wear old clothes and shoes
You might be thinking, “I’ll just be really careful”. Don’t even try it. Nobody, in the history of driveway sealing has been able to walk away clean, without a spec of sealer on them. Like trying to dive into a pool without making a splash, it’s just not possible.
You could wear decent shoes and wrap some plastic bags around them. Or, you could spend $10 on a pair of shoes from Walmart that you can say good-bye to forever when you’re finished.
Make sure it’s nice and hot out and won’t rain for 48 hours
In the south, this is an easy rule to follow. But in the North, that really only gives us a window from June – September.
If it does rain on your sealer while it’s still drying / curing, it will combine to create a white-colored rough texture that does not look good against black driveways.
One way to be safe is to do a rain dance in reverse.
Repair cracks and holes with asphalt patch
This seems like more work than it’s worth, but think about it. You’re sealing your driveway for two reasons: aesthetics and protection. The sealer can’t prevent water from getting under your driveway via cracks and holes. This water can freeze and expand – you get the rest.
So, take a few minutes to fill those cracks and holes. Otherwise, this could happen:
Start Sealing
Pour a gallon at a time and spread a thin coat in a cross pattern (squeegee one direction, then the other to fill in all pores).
The 5 Gallon bucket is heavy, so it can be helpful to have a one-gallon bucket on hand to scoop some out of the larger bucket. Unless you’re this guy:
Stay off it!
Give it at least 24 hours before walking or driving on it. Unless you have special talents.
Just one more thing…we're inviting 5 new DIYers to our Become an Author program. Write articles just like this one and earn a little pocket money at the same time! Learn more »
Our pool pump has been creating a large mud pit next to our side door whenever we need to drain the pool or backwash the filter. I decided to dig a 125 trench and put in a 4″ flexible drain pipe to send the water down to the bottom of our front yard.
My first inclination was to rent a 12″ compact excavator from Home Depot. It ran about $160 or $170 for the day. But two things came to mind:
I had never really installed an trench drain before, so I didn’t want to underestimate the job and require the machine rental for more than one day.
I don’t know what kind of damage those machines do to the rest of your landscape, yard or driveway.
The Wrong Shovel
Given my unfamiliarity with the excavator and everything that comes with it, I opted for the manual route: the shovel.
I had a $5 shovel in my garage that I used to dig about 30 feet of the drain trench. The ground was rocky, so I really had to put some weight on the shovel which, in most cases, involved jumping on it with both feet to get it to penetrate.
After an hour or so, not only were my middle of both of my feet sore, but I had slipped off of the shovel while jumping on it at one point and cut my leg on it.
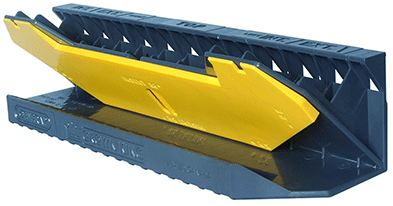
The Right Shovel
I decided to head over to Home Depot and purchase the best shovel money could buy. I was surprised to find that the most expensive shovel was only $25. I was expecting at least a few shovels with gimmicky features, buttons, levers, etc. The selection was pretty basic, but one shovel really stood out.
The RazorBack Shovel had a much larger surface to put weight onto. Meaning that if you needed to jump on the shovel, you had a larger surface to distribute the weight of your body onto. This meant that it not only reduced the chance of missing the shovel when jump on it, but caused far less pain on the bottom of my foot at the end of the day.
The metal “tabs” that you put your foot on also had a few holes drilled or punch into them. This provides a little bit of grip to prevent your foot from sliding.
Conclusion
I’m not going to say that this shovel changed my life, but it was certainly worth the $25 I paid for it. It probably only saved me 10% time-wise, but it certainly did reduce the foot pain. I actually had no problem using it in tennis shoes, as opposed to work boots.
As a bonus, when I put the shovel in my shopping cart, a guy walked by and said “That’s a nice shovel”. No joke!
Where to Buy
As I mentioned, I found this shovel at Home Depot. But if you’re more the online shopping type, you might give Amazon a try. Although, I couldn’t find the exact Razorback round-tipped fiberglass shovel that I have. I only found the wooden handle version.
Just one more thing…we're inviting 5 new DIYers to our Become an Author program. Write articles just like this one and earn a little pocket money at the same time! Learn more »
It’s Thursday morning, I’m working quietly in my home office when I hear the doorbell ring. I take a peek out the window to see a heavy duty truck in the driveway and a guy wearing a contractors safety vest at my door.
The Pitch
“Hey, I’m Bob, we have a crew doing road work down on Main Street and have a half a truckload of leftover asphalt. I noticed that your driveway hasn’t been paved and I can offer you a really good rate.”
We had actually requested three quotes to pave one of our driveways and to put a top coat on the other driveway. All three quotes came in above $10,000, so we tabled the project for a better time.
I explained to Bob that we had already received quotes and they were well out of our budget. He replied that he would offer the leftover asphalt in his truck at just $2.50 per sq. ft. And, if that wasn’t enough to cover the driveways, that he would maintain that same price to complete them with a new load of asphalt. He also went on to tell me that they use a commercial grade asphalt that never requires sealing.
“Well Bob, if you think this can be done for under $5,000, I’d be very interested.”, I said.
“That’s no problem at all, I’ll take care of you, and we accept cash, check or charge.”, Bob replied.
I asked Bob if he could show me the job his crew were working on down the road. He obliged and offered to drive me down to see the work. On the way, we talked a bit, and I mentioned how I hadn’t seen any road work around here. He replied that he was actually referring to a residential driveway that his crew was working on.
At that point, I thought it a little strange that he had leftover asphalt from a single driveway job, but I didn’t ponder it any further. We stopped at the residential job, and I saw guys going work to remove high spots on a driveway, but didn’t get a glimpse of completed work.
“Bob, have you guys done any other jobs in the area? I’d like to see how it came out.”, I asked.
“Yeah, hop in, we did a couple down the road last week.”
So we drove by a couple more completed driveways. I supposed he could have shown me anything, whether his crew completed it or not, but his clever conversation along the way was paving the way to earn my trust.
“So you guys really accept credit card?”, I asked, recalling his pitch at my front doorstep. Bob deflected and started a different conversation. I didn’t think anything of it at the time.
The “agreement”
After the ride, I gave Bob the go ahead to get started. I hadn’t signed a contract, but Bob had earned enough false trust from me that I had completely forgotten about it. That afternoon, Bob came by with a BobCat and spent 1/2 hour grading our driveways. The scam had begun.
After grading, Bob informed me that his crew would be back in the morning to start paving.
Friday morning came and the guys arrived in their trucks and started parking their equipment. It started with a load argument between two of the workers. Almost an hour went by without anything getting done.
Around 10AM, the “boss” arrives and work begins. They fire up the garden hose and start supplying water to their machine that heats up and spreads the asphalt onto the driveway. They got about halfway down the driveway, then stopped. I heard nothing for 2 hours.
Then, a knock at my door. It was Bob and his brother. They asked me to come outside and talk numbers. We go down to the end of the driveway and the whole crew comes over to join us. While I’m standing there, surround by Bob and six of his crew members, Bob’s brother explains that the cost for the first driveway will be $7100.
Normally, I might have been intimidated by their crew forming a perimeter around me, no doubt the strategy they were trying to employ. I felt deceived though, and I looked Bob in the face and ask him, “what happened to the $5,000 we talked about for both driveways?”.
Bob didn’t say anything, instead his Brother started going into the costs of asphalt and that he’d be happy to come back in the fall and finish my other driveway once we settle up. I asked him how it possibly could come that $7100 at the cost of $2.50 per sq. ft.
That’s when Bob’s brother explained that they had to run two courses of asphalt on the driveway, and that each course was $2.50 per sq. ft.
I said, “Bob, you guys are playing games. We talked about $5,000 and I can’t spend $7,100 on a single driveway right now.” Then, a bunch of other ramblings that I can’t recall.
Afterwards, we all sat there silently. It was a tension they were clearly used to. But I wasn’t, and they knew that. After what seemed like a couple minutes of silence, Bob said that they could finish up this one driveway and settle up. Then, to call them back in the fall to talk about driveway #2.
I told Bob that I wanted them both completed. “Bob, I was honest and open with you that I was quoted above $10,000. You were shocked at that number and said $5,000 was no problem.”
Bob said, “Okay sir, I’ll tell you what, I can do them both for $8,200”.
We settled on that number and they finished the first driveway. Afterwards, Bob asked for $6,500 to cover the costs and payroll for the first driveway. I said no problem, we drew up a contract and I signed it. Then I asked them to hold tight while I get my credit card.
Bob’s brother then chimed in, “Sir, we can’t take credit cards.”
“Hold on.”, I said. “What was that? Bob just explained to me yesterday that you accept cash, check or charge”.
“Oh, he must have been talking about those checks you get from your credit card company.”, Bob’s brother added.
“You guys are really something, let’s just get this over with. I’ll head to the bank and get some cash, just hang out for a few minutes”, I said.
While I was driving back from the bank, I had realized I was being scammed and it was really ruining my afternoon! But, whats worse, I had just realized that the $6,500 we agreed on for the first driveway was 75% of the total cost. They were not going to come back to finish the next driveway.
So, I told Bob, “I’m not comfortable paying you guys for most of the job before it’s completed. How about I give you half now.”
Bob replied, “Sir, I’ll need to talk to my brother, it’s in the signed contract and I know he won’t go for it.”
“Okay”, I said, ” listen, you take half now and I’ll give you and extra $300 at the end.” Yes, I was actually going to pay these guys more than the signed and agreed rate, simply because I didn’t trust them to return.
Bob agreed, and did actually return on Monday to finish the driveway. Afterwards, his brother explained the sealing process to me.
“What! Bob told me that this thing never has to be sealed! You guys are killing me”, I said feeling smaller and smaller each time I talk to these guys. I had been completely mislead from the beginning.
Once the paving was complete, I asked them to clean up the asphalt before giving them the final $300 I promised. They cleaned up half of it, then Bob said, “I need to grab my truck to get the rest, it’s right down the road. Could we settle up now?”
I said, no problem. Thinking, surely these guys weren’t going to push me over the edge by not coming back to spend 5 minutes cleaning up.
Well, I gave him the $300, he drove off, and never returned.
The yard was mess, my lawn had ruts from their equipment, the driveway had wavy lines down the edges, and didn’t come flush to the cement in front of my garage.
They told me stories about their kids to gain my trust, then lied to my face immediately after. It was a really strange few days. In the end, we do have paved driveways, but the quality and workmanship is terrible.
So, I’m really hoping this is a lesson to those out there who might fall victim to this scam. I read about it, it’s actually a common asphalt paving scam. The old “I have extra asphalt” line is apparently one of the oldest in the book!
Learn from my mistake:
Get a contract signed before work begins
Get referrals from their other customers
Check them out on the BBB website
Don’t fall for the smooth talking guy in the safety vest!
Just one more thing…we're inviting 5 new DIYers to our Become an Author program. Write articles just like this one and earn a little pocket money at the same time! Learn more »


 You might be thinking, “I’ll just be really careful”. Don’t even try it. Nobody, in the history of driveway sealing has been able to walk away clean, without a spec of sealer on them. Like trying to dive into a pool without making a splash, it’s just not possible.
 In the south, this is an easy rule to follow. But in the North, that really only gives us a window from June – September.


 My first inclination was to rent a 12″ compact excavator from Home Depot. It ran about $160 or $170 for the day. But two things came to mind:
 I decided to head over to Home Depot and purchase the best shovel money could buy. I was surprised to find that the most expensive shovel was only $25. I was expecting at least a few shovels with gimmicky features, buttons, levers, etc. The selection was pretty basic, but one shovel really stood out.