I’ve installed shelving using two different bracing methods, each having their pros and cons. The first method uses factory-made metal utility shelf brackets, the other, homemade wood shelf brackets.
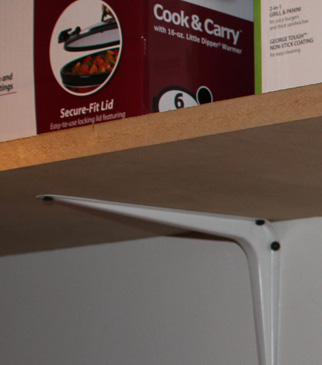
The advantage to the metal utility shelf brackets is that they consume less space (if you use the cheaper ones) and they’re typically more aesthetically pleasing.
Homemade wood brackets consume more space, but are typically stronger than their factory-made metal counterparts (unless you use the more expensive metal brackets with an angled support bar).
 Wood Shelf Brackets
 Wood Shelf Brackets
To create wooden brackets, purchase an appropriately sized two-by piece of lumber from your home improvement store. If you’re putting up 14″ shelving , purchase a 2×12. The amount of lumber you need will depend on the number of brackets you need. Using a 2×12 for an example, if you need 10 brackets, you’ll need about 5ft. of lumber. Since you’ll be cutting triangles, a single ft. of board will create two brackets.
Use a miter saw to make alternating 45 degree and straight cuts until you have enough brackets. If you don’t have a miter saw, grab an angle finder for about $10.
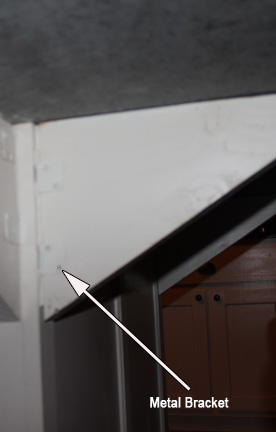
To hang your homemade wooden brackets properly though, you’ll need to pick up some metal joist hangers. These essentially “cup” the wood bracket and provide tabs on the side which you can drill into.
Hanging Brackets
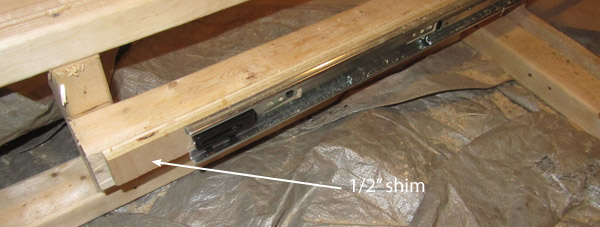
 In either case, metal or wood brackets, you’ll have to find a stud to screw into to support the weight of the shelf contents. Once you start driving your first screw, it may hit you that a stud is only 1-1/2″ wide and the screws on the metal brackets are about 1-1/4″ apart. The holes on the joist hangers are even further apart.
There are a number of tricks to dealing with this, but the one I like is simple, drive your screws at an angle towards the stud. You can get away with using a standard 1-5/8″ drywall screw for the metal brackets. But, for wood brackets that require joist hangers, I’d suggest using at least a 2-1/2″ screw to cover the greater distance and ensure a strong hold. Just be very wary of any wiring that might be behind the walls when using longer screws. The reason drywall screws are 1-5/8″ is because that’s typically a length that won’t poke into a wire that runs through the middle of a joist.
Once you have the brackets attached to the wall, you’ll need to drive screws up through the bracket, into the bottom of the shelf. You’ll need to go through bottom of the shelf to ensure that the screw head has good contact with the bracket. If you only have drywall screws available, and they end up sticking through the top of the shelf, you can knock the tips off with a hammer, the screw will snap fairly easily after a couple light blows with the hammer.
Shelf Material
For utility shelves, I use MDF board. It’s cheap and has a nice smooth surface that’s easy to paint. It also doesn’t expose an unsightly rim of individual plies around the perimeter of the shelf piece. Though, If you’ve ever need to wear a dust mask while cutting, this is the material to use it! MDF creates an enormous amount of dust when cut.
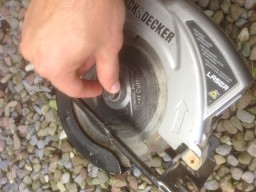 The easiest method of cutting vinyl lattice is to grab your circular saw, reverse the blade, and cut away! The reversed blade prevents the teeth from “chopping” through the vinyl, instead allowing the smoother surface of the blade to somewhat “melt” through it.
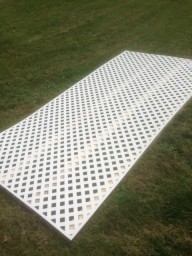 That’s simple enough, right. The next trick was figuring out how to position the lattice so I can run the circular saw blade across it. I decided to support the vinyl lattice on three 2x4s, evenly spaced on the ground. This would provide enough clearance for the circular saw blade.
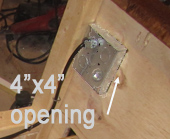 After determining that the 4×4 metal box was the way to go, I used a jigsaw to cut a 4″ x 4″ opening in each frame side. You’ll want this opening to be flush to the 2×3 stud in the rear, so you have something substantial to mount the box to.
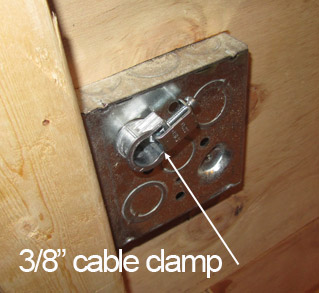 Using a replacement cord allows us to “plug” our bed outlets directly into a home outlet. The first step is to punch out one of the knock out holes on the back of the metal electrical box, then insert a cable clamp in it’s place. The exact part you’re looking for is a 3/8″ saddle connector.
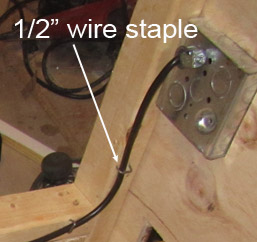 Then, be sure to secure the wire along the bed frame with staples. The NEC does have guidelines on this. Last time I checked, you had to staple within 8″ of the box itself, then every 4 feet. I stapled every 12 inches since it’s such a small run. This is extremely important, not only for code, but to ensure that the drawers don’t hit the wire as they slide in and out.
 I decided to add one switch and one outlet to each side of the bed, hence the 4″ square electrical box. The switch will control the lower of the two outlets.
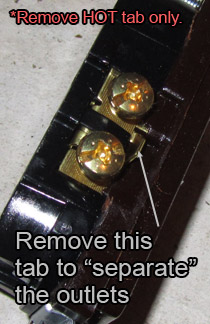 If you’ve ever looked at a receptacle, you may be wondering how you can have a switch control only one of the outlets. Most outlets have a “tab” that we can grab with a pair of needle nose pliers and remove, which essentially separates the outlets electrically. We only want to remove the HOT tab. The neutral (white wire) tab needs to stay intact (otherwise we’ll need to run two neutral wires to the outlet).
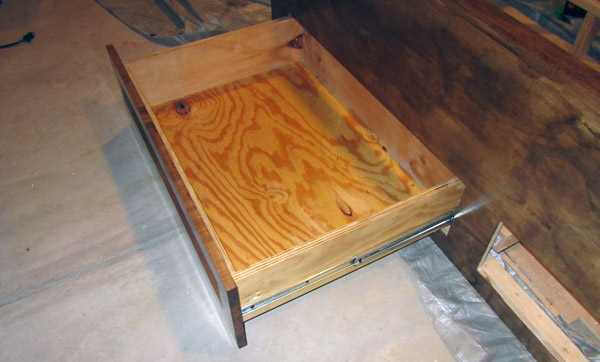
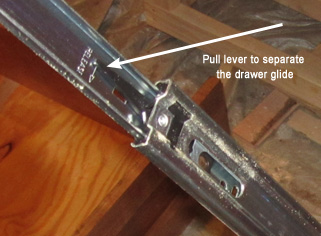 Before beginning either of the two steps above, you’ll need to separate the two halves of the glide. There’s a lever that you’ll pull, which allows the two halves to come apart, as shown to the right.
 The platform bed has a significant amount of visible plywood face (none of the plies or sides are visible), so I had to make sure I used a plywood with a decent grain. The other option, of course, is to paint. I prefer paint as it’s much more forgiving of your level of wood craftsmanship. In my case though, the rest of the furniture in the room is stained, so we wanted a consistent look.

 If I were smarter, I would have planed the 7/8″ board down to 3/4″ with my thickness planer. I missed this detail though, and am left with a couple face frames with very uneven joints.
 Before we switch to a finer grit sandpaper, take that 60 grit and run it along any edges that might come in contact with human hands. It’s sounds funny, but wood is sharp, especially hardwood. If you’ve gone with a shaker-style look as I have, the edges will be sharp as a knife. I’ve actually cut myself on my cabinet drawer fronts, trying to open them before they had handles.